AX COMBAT
Anti-Xeno Combat, often simply abbreviated to AX, is the act of engaging in combat against the Thargoids, a spacefaring territorial insectoid species that employ biomechanical ships and technology. AX combat is considered to be the most challenging PVE discipline in Elite Dangerous.
TABLE OF CONTENTS
- What are the Thargoids
- Thargoid System States
- Thargoid Scouts
- Thargoid Interceptor
- Thargoid Interceptor Weapons
- Thargoid Interceptor Mechanics
- The Swarm
- Interceptor Basic Combat Mechanics
- Combat Advice
- Combat Styles
- Finding Interceptors
- Further Readings
- Cold Orbiting Exercises
- Cold Orbiting Challenges
WHAT ARE THE THARGOIDS

The Thargoids are a spacefaring, territorial, insectoid species that are commonly found in nebulae areas with ammonia based life. Thargoids can be found in the local Coalsack, Pleiades, and Witch Head Nebulae but have been found as far away as the Omega and Cone Nebulae, some 5,000 light years away from Sol.
Thargoids come in two variants: Thargoid Scouts and Thargoid Interceptors, with Thargoid Scouts acting more like the traditional PVE opponents you will have encountered already.
Both Thargoid Scouts and Thargoid Interceptors can damage your ship with their main weapons but both also have the ability to fire missiles that apply a caustic effect if they hit. This caustic effect applies damage permanently over time to your hull until you remove it by cooking it off through overheating or by using a decontamination limpet.
THARGOID SYSTEM STATES
SYSTEM OF INFESTATION
Systems with the state of infestation are systems that are susceptible to incursion by the following tick. These systems will spawn non-human signal sources where players must destroy a significant number of interceptors to ward off the incoming incursion. Should the players fail to meet this requirement, the system will enter a state of incursion.
SYSTEM OF INCURSION
During a Thargoid attack, a system’s state will change to a state of incursion. During this period, an abundance of non-human signal sources will spawn in the system along with anti-Xeno conflict zones where you will be able to fight alongside other players or NPC controlled ships to ward off the incoming Xeno threat.
In the same system, stations disabled by the Thargoids make it hard to repair ships after completing a conflict zone without the presence of a fleet carrier. In the same system, all bulk cruiser megaships will be damaged.
During a system’s state of incursion, the system’s Thargoid presence will be reported by Galnet on a daily basis similar to the daily tick used by BGS squadrons. Thargoid presence is dictated by the number of Anti-Xeno conflict zones won during that period.
- Massive Thargoid Presence (0%-25% Thargoid presence eliminated)
- Significant Thargoid Presence (25%-50% Thargoid presence eliminated)
- Moderate Thargoid Presence (50%-75% Thargoid presence eliminated)
- Marginal Thargoid Presence (75%-100% Thargoid presence eliminated)
- No Thargoid Presence (100% Thargoid presence eliminated)
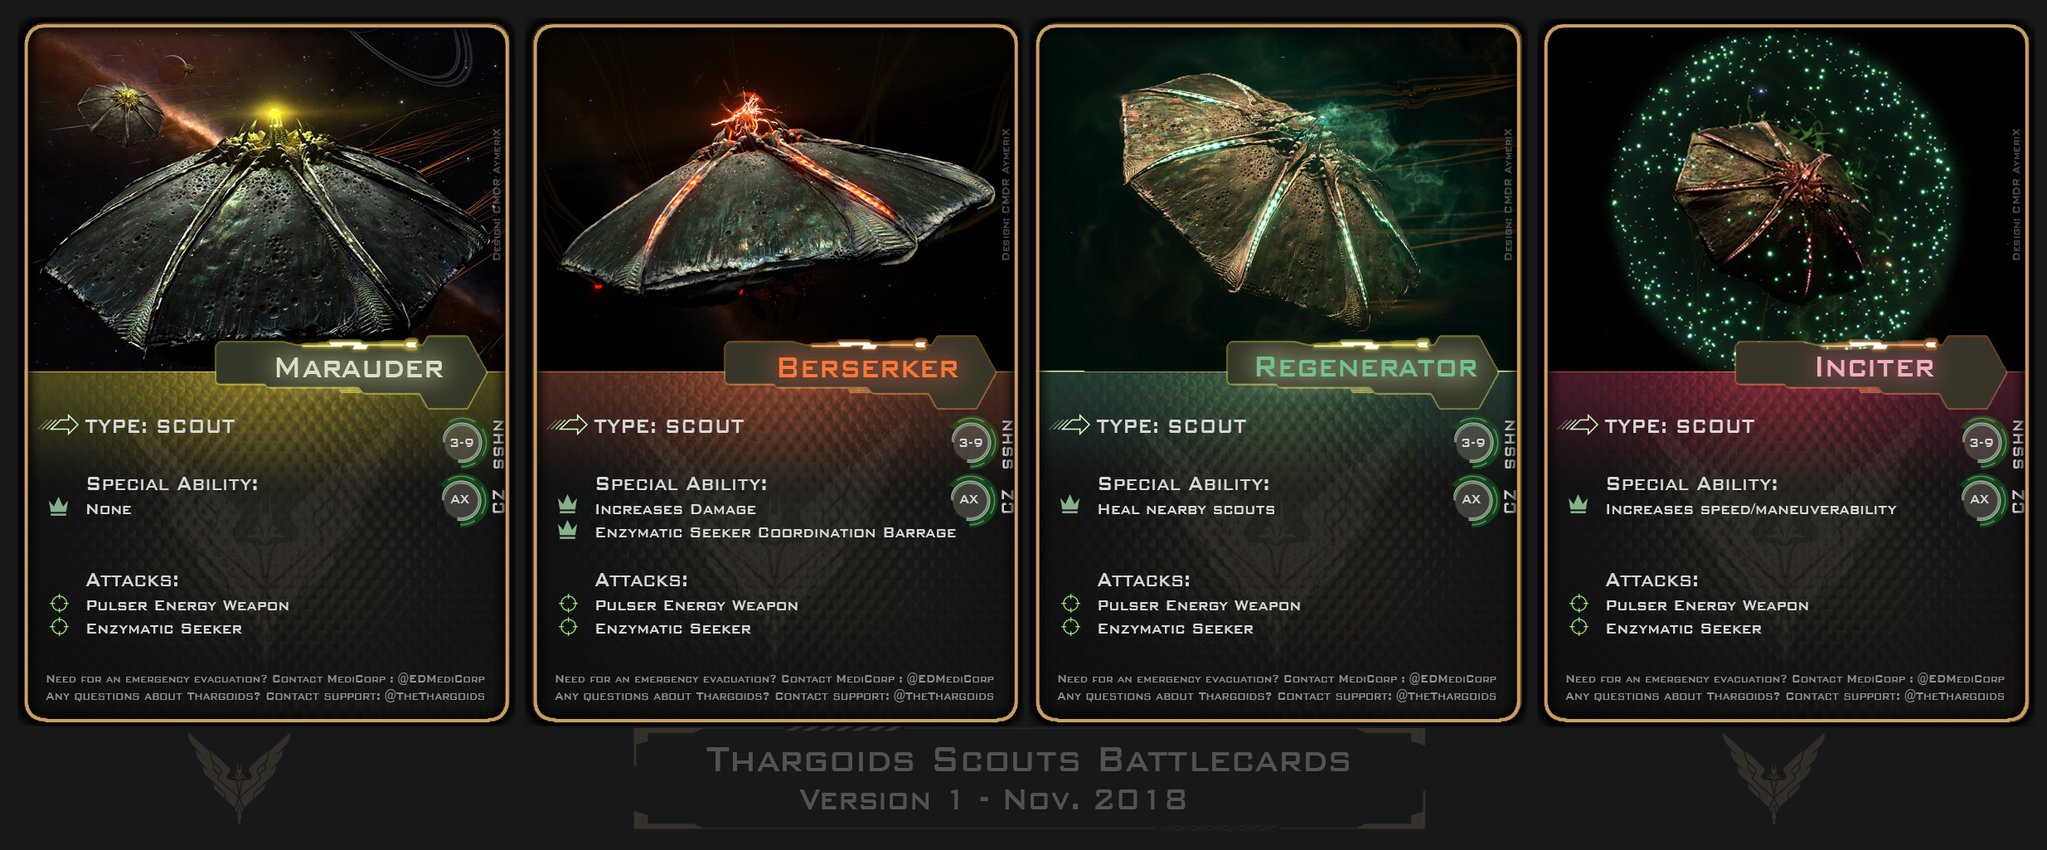
THARGOID SCOUTS
Thargoid scouts are slower and more agile, and much smaller than Interceptors. Scouts can be found alone or with Interceptors in Non-Human Signal Sources of Threat 4 or higher, in Anti-Xeno Conflict Zones and at Damaged Megaships
Unlike Interceptors, all scout variants are immediately hostile to players and can be a significant threat to the unprepared. Scouts have a 77% damage resistance to traditional human weapons and are immune to damage from missiles and torpedoes. Thus, it is more efficient and effective to use specialized AX weaponry against them.
Destroying a Thargoid Scout yields a player 80,000 Cr in bonds regardless of the variant.
It should be noted that Thargoid Scouts typically operate in groups, and some of the variants are able to use their abilities to buff other scouts in various ways. These buffs affect all scouts in the instance. More detail on the variants and their abilities is below.
THARGOID SCOUT VARIANTS
- The Marauder Variant - the most common variant, armed with a basic pulse weapon and a caustic missile
- The Berserker Variant - can buff the damage output of all other scouts nearby and can trigger all non-Berserkers nearby to launch their caustic missiles
- The Regenerator Variant - can regenerate the damaged hulls of all other scouts nearby
- The Inciter Variant - can buff all nearby scouts’ agility and speed.
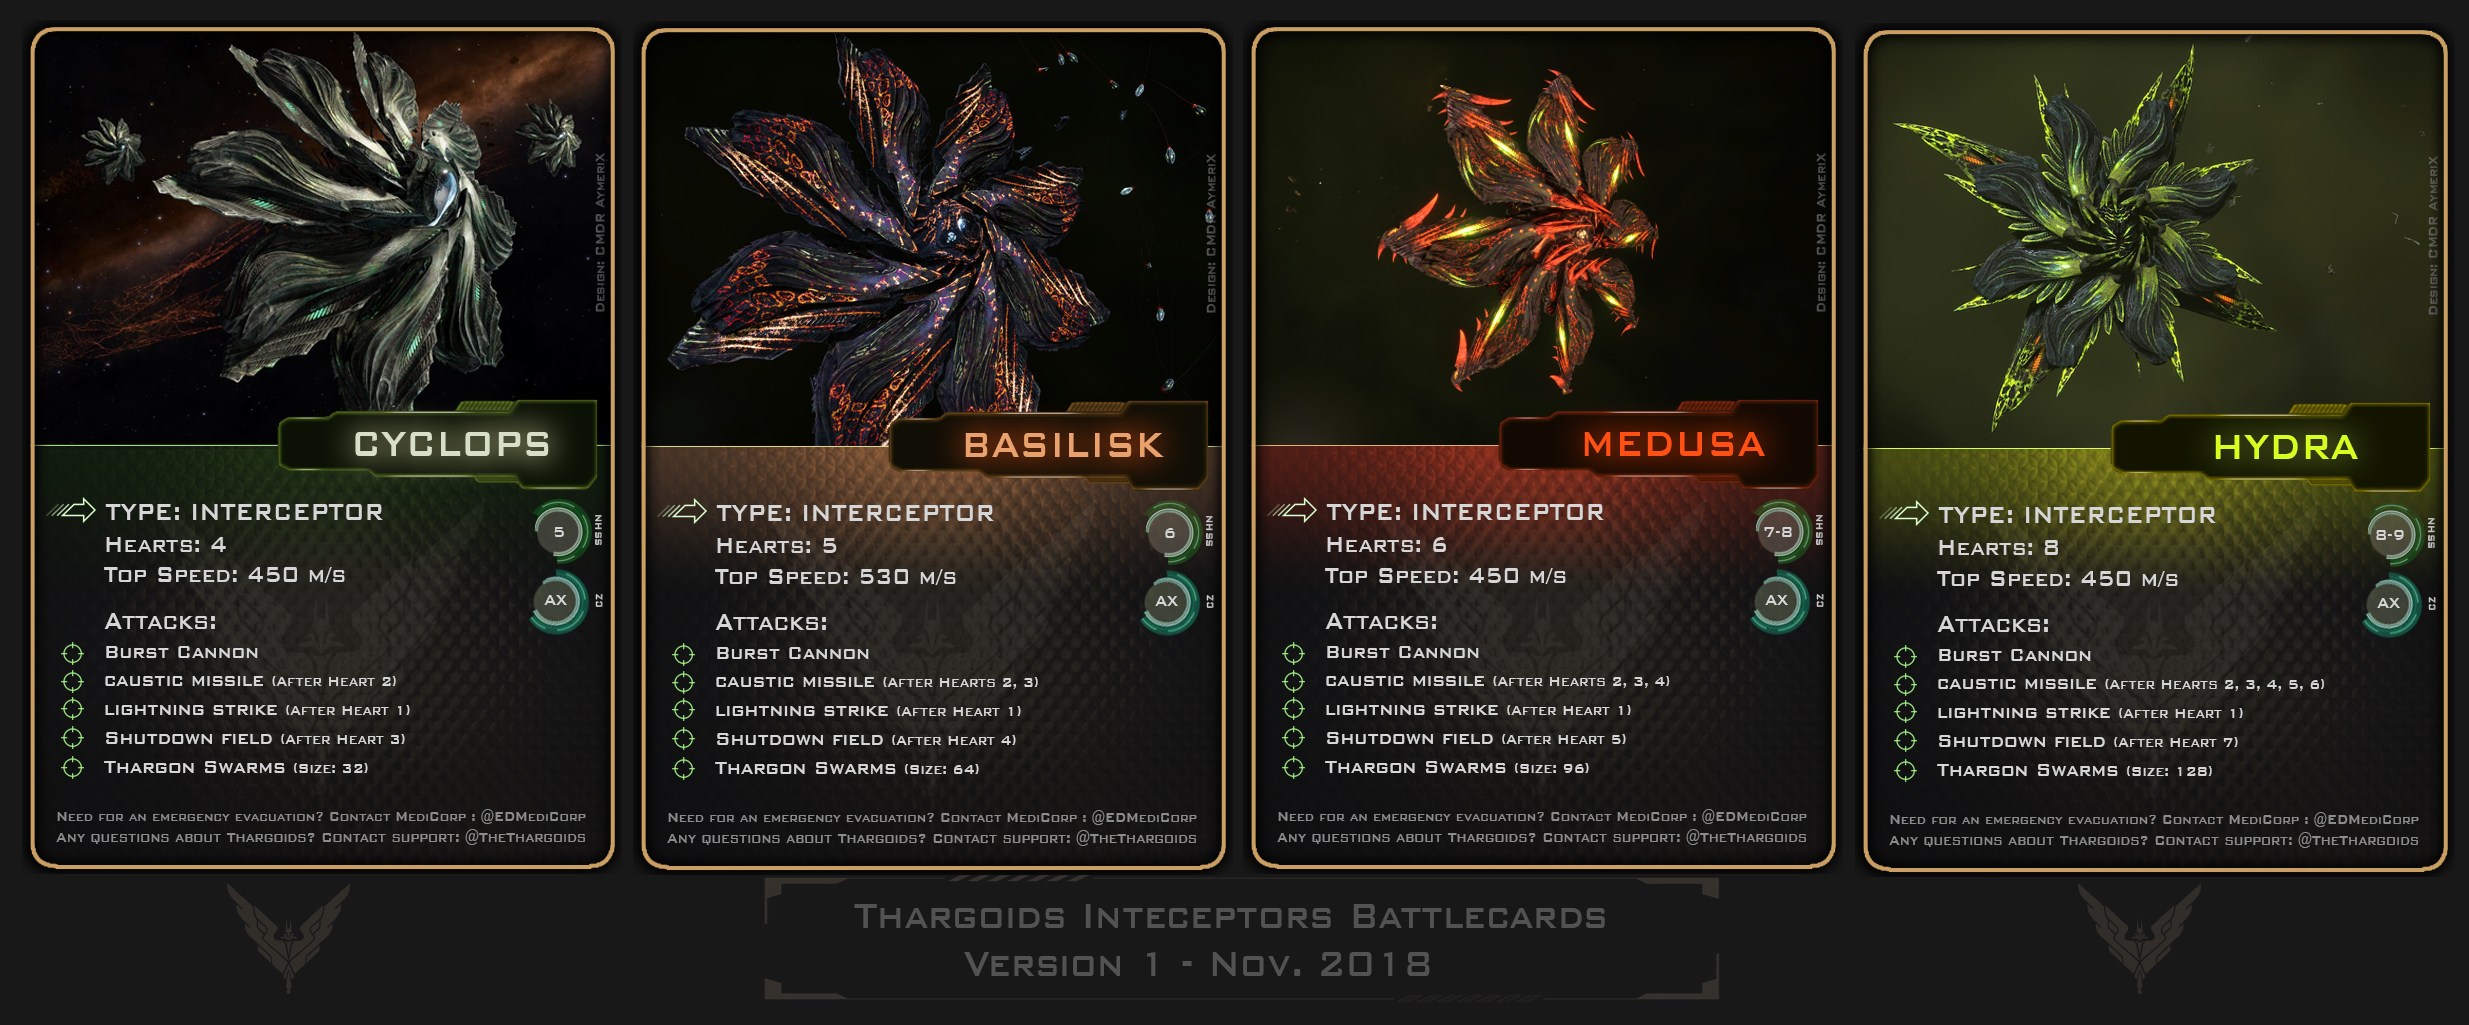
THARGOID INTERCEPTORS
Interceptors are the principal combat ships employed by the Thargoids and currently come in 4 varieties: Cyclops, Basilisk, Medusa and Hydra, with each posing a greater challenge than the last.
Fighting Interceptors requires specific skills and knowledge along with a ship that is tailored specifically for it and is markedly different to any PVE combat you will have experienced in-game. Hunting Thargoid Interceptors can be a very lucrative profession with Cyclopes, Basilisks, Medusae and Hydrae being worth 6.5, 20, 34 and 50 million credits each to all Commanders in the instance on its demise that have damaged it (this includes beaming it).
All Thargoid interceptors deploy a swarm of drones (Thargon swarm), with the size and formation of the swarm dependent on the type of interceptor.

If you encounter an interceptor in an instance with Thargoid Scouts, then the interceptor will immediately become hostile. However, if the interceptor is alone, it will not become hostile, and will investigate you before wandering off to do its own thing, and respond as follows:
- If you have Thargoid-related commodities, it will wait for you to dump these items if you do not it will become aggressive and hostile.
- If you have Guardian-related commodities, it will immediately become hostile.
- If you do not keep a safe distance or the interceptor detects you as a potential threat, it will release its swarm as a warning. If it detects you as a threat, it will become hostile.
- Shooting the interceptor or using research limpets on it will make it become immediately hostile.
Thargoid Interceptors are highly complex, so we will begin by describing the four variants.
CYCLOPS INTERCEPTOR VARIANT

The Cyclops is distinctive by its dull green color tone. It's the weakest interceptor that you will encounter and is thus the easiest of the interceptors to deal with. Cyclops are extremely fragile in comparison to later variants. This variant is able to deploy a swarm of 32 Thargons and has 4 hearts. Destroying a Cyclops interceptor will net every Commander in the instance that has damaged it 6.5MCr each.
BASILISK INTERCEPTOR VARIANT

The Basilisk is distinctive by its burnt color hue and is similar in shape to the cyclops. Some seasoned AX pilots consider the Basilisk variant harder than the Medusa due to its high top-speed. While it is able to catch up to a ship rather quickly, it suffers from being unable to change vectors effectively. Veteran AX fighters often use its weakness to gain distance from the interceptor by passing at high speeds, using its velocity against it. This variant is able to deploy a swarm of 64 Thargons and has 5 hearts. Destroying a Basilisk interceptor will net every Commander in the instance that has damaged it 20MCr each.
MEDUSA INTERCEPTOR VARIANT

The Medusa is distinctive by the thorns on its petals and its blood red hue. The Medusa is the second hardest interceptor known to exist with strong defences and a high regeneration rate. The damage output also jumps dramatically from the Basilisk to the Medusa so good range control and heat management is required. This variant is able to deploy a lethal swarm of 96 Thargons. Destroying a Medusa interceptor will net every Commander in the instance that has damaged it 34MCr each.
HYDRA INTERCEPTOR VARIANT

The Hydra is distinctive by its glowing green lights and its pointed edges instead of petals. The Hydra is the most destructive and hardest variant in Elite Dangerous. The Hydra variant is unique in that an exerted heart appears as 3 rows of dots with the row furthest from the center being the point that should be targeted. A Xeno Scanner makes it easier to target the heart effectively until you have developed sufficient experience. This variant is able to deploy a massive swarm of 128 Thargons. Destroying a Hydra Interceptor will net every Commander in the instance that has damaged it 50MCr each.
THARGOID INTERCEPTOR WEAPONS
MAIN CANNON FIRE
All interceptors have a main cannon with a range of 3km that fire caustic, phasing munitions (these do not apply the caustic damage over time effect) that allow damage to bleed through shields, and an Interceptor fires a fixed number of volleys during an attack run before it is obliged to turn away and rearm, with the volley size and damage per volley varying per Interceptor variant.
SECONDARY WEAPONS
In addition to their main cannon, Interceptors have three secondary weapons, the timing and use of which are predictable and consistent.
CAUSTIC MISSILES
After the destruction of each heart other than the 1st and penultimate ones, the Interceptor will try to target you during its regenerative, sleep phase. If it can, it will launch a volley of caustic missiles, the size of the volley being dependent on the variant of Interceptor. Each missile travels at 350m/s and should be easily avoidable but if you are hit by one it will impart caustic damage over time until you either burn the effect off or use a decontamination limpet.
To avoid being targeted you need to either be outside of the 3km targeting range or at less than 20% heat for the duration of the Interceptor’s sleep phase. For a cold orbiting build the easiest way to accomplish this is to go into silent running after the heart is destroyed and then to boost out of range, exiting silent running once the Interceptor is more than 3km away.
LIGHTNING ATTACK
After the destruction of the 1st heart, the Interceptor’s lightning attack is unlocked. This attack, available once per reload and at any time during the lightning chase that follows the destruction of the 1st heart, is triggered when you come within 700m of the Interceptor, has a range of 800m and acts like a tractor beam pulling you in front of its main cannon whilst also doing significant shield damage (if you are shielded) and rebooting random systems.
To avoid this attack, you need to ensure that you don’t come within 700m of an Interceptor after the destruction of the 1st heart. If you do, there is still the chance that you can boost out of the 800m effective range of the lightning if you act quickly enough, but even if you can’t, you can still use the lightning to your advantage as it allows you to shoot at the Interceptor without it being able to shoot back until the end of the lightning attack. This also allows you to perform execution kills after the destruction of the last heart as an Interceptor that is undertaking a lightning attack will not enter its sleep phase until after the attack ends.
SHUTDOWN FIELD (EMP)
After the destruction of its penultimate heart, an Interceptor will attempt to target you and, if successful, will fire its shutdown field weapon. This weapon has an effective range of 10km and, if you are within that range, your ship will be disabled for approximately 30s. As with caustic missiles, you can avoid the shutdown field being triggered by being beyond targeting range or by staying cold within the Interceptors targeting range, but, if there is another Commander in the instance that can be targeted, you will still be affected by the use of the shutdown field and if you see the COVAS warning “Energy surge detected” you should immediately take action.
If you do not have a Shutdown Field Neutralizer, boost and turn flight assist off as this should allow you to drift far enough away to not come under direct fire while your ship is disabled. If you do have a neutralizer, wait approximately one second after the COVAS warning, then activate the neutralizer, keeping it running until the pulse passes your ship. It is advisable to put all pips into systems when using the module as it drains the systems capacitor rather quickly. Timing is important here. If you release the neutralizer, it will require time before it can be deployed again.
An Interceptor will also fire its shutdown field on entering into any instance that you are already in (e.g. an AX Megaship instance, AX conflict zone or NHSS instance with scouts) and immediately after hyperdicting you.
THARGOID INTERCEPTOR MECHANICS
Thargoid Interceptors exhibit complex behavior, and combat against interceptors consists of multiple different stages. However, the flight behavior of the interceptors is relatively simple. All interceptor variants are fast but are unable to reverse direction swiftly. Cyclopes, Medusae and Hydrae travel at 450m/s, and Basilisks at 530m/s. A characteristic that AX pilots take advantage of to control range when required.
THARGOID INTERCEPTOR HULL AND HEARTS
The hull and hearts of an Interceptor are 99.97% resistant to human weapons but can be damaged by AX weapons. AX weapons generally fall into three categories: human devised AX weapons (AX Multi-cannons and Missile Racks); human engineered weapons that become usable for AX when you synthesize AX ammunition for them (Advanced Multi-cannons and Missile Racks); and Guardian Hybrid weapons (Gauss Cannons, Shard Cannons and Plasma Launchers (including their modified versions)). Of the three categories, the most efficient and effective are the Guardian Hybrid weapons as Human devised weapons are generally of no use in solo fights beyond Basilisk level Interceptors and Human engineered weapons are inefficient as they require synthesis to be usable. Of the Guardian Hybrid weapons, the regular Guardian Gauss Cannon remains the preferred weapon of choice for AX Commanders.
Each Interceptor has a significant amount of hull, the amount of which depends on the variant, and is capable of regenerating its hull provided at least one heart remains, with the amount able to be regenerated being tied to the number of hearts remaining.
In order to destroy an Interceptor, you first need to do sufficient damage to it (20% of the then total hull remaining) to exert a heart. Once a heart is exerted you have 45 seconds to destroy it and during that period the hull regeneration rate increases substantially. If you are unable to destroy it within this period you will be forced to re-exert the heart, but damage done to a heart does not regenerate. Once you have destroyed the last heart, the Interceptor loses its regenerative ability and is easily destroyed.
Although it is possible to destroy a Cyclops through sheer weight of fire, the same cannot be said for harder Interceptors and as such we recommend that you adopt the approach of destroying an Interceptor by destroying each of its hearts.
THARGOID INTERCEPTOR SHIELDS
Thargoid Interceptors have shields they put up immediately after losing one of their hearts, the strength of which depends on the variant. Unlike human shield generators, an Interceptor’s shields decay over time before they break. The rate of shield decay is the same across all Interceptors, and thus takes longer for harder variants.
Unlike an Interceptor’s hull, the shields are not resistant to human weapons, sharing the same resistances and weaknesses as human shields and in a cold orbit build, the long-range thermal vent beam laser is used both to cool the ship and to help hasten shield decay.
Interceptors put up a “panic shield” in the following circumstances:
- The Interceptor’s shield breaks within 15 seconds of it having being deployed
- The Interceptor sustains heavy damage to its hull overwhelming the regenerative ability of an exerted heart (typically seen in wing fights or where modified plasma chargers are used)
- The interceptor releases its special attacks like the shutdown field or caustic missiles after its shield has already been broken.
ENRAGE TIMER
Thargoid Interceptors have an enrage timer, 6 minutes, 7 minutes, 7 minutes, and 8 minutes for Cyclops, Basilisk, Medusa and Hydra respectively, which starts when they initially become hostile and resets each time a heart is destroyed. If you take too long to exert and destroy a heart, the Interceptor will enter an enraged state during which it will launch a new swarm every time an existing swarm is destroyed and if the swarm is agitated the entire swarm will turn into missiles and launch themselves at you.
THE SWARM
As mentioned earlier, Thargoid Interceptors deploy swarms of Thargons. These are miniature “drone” type ships which move together and can take on multiple different formations. The size of the swarm depends on the Interceptor variant. The swarm normally moves at 500 m/s.
SWARM DEPLOYMENT
An Interceptor deploys its initial swarm either as a response to your being too close to it, or once it considers you hostile. And may launch replacement swarms during combat.
Where you destroy a heart having first deleted the swarm, the Interceptor will launch a new swarm at the end of its associated sleep phase. If, on the other hand, you destroy a heart without having deleted the swarm, the Interceptor will “bank” 1 swarm and will release it as soon as the existing swarm is deleted. An Interceptor can only bank 1 swarm at any time. If the Interceptor is enraged, however, it will release a new swarm as soon as the existing one is destroyed.
Occasionally an Interceptor will refill a part-depleted swarm. If it does, this has no effect on a banked swarm, and is, unfortunately, a relatively unpredictable event.
SWARM STATES
When deployed and regardless of whether the Interceptor is enraged or not, a swarm is in its normal state. If you fly through the swarm at any time, the swarm will become agitated resulting in its formation changing, its speed reducing from 500 m/s to around 360 m/s and it looking to make distance from you to be able to trigger its missile attack. An agitated swarm switches states from normal to missile mode every 30 seconds and in order to reset an agitated swarm you can kite it to fire its missiles and then fly through it again. You need to stay within 3 km range of it during the missile firing and when you start your fly through run. If the Interceptor is enraged, by kiting it to fire all its missiles whilst keeping just under 3 km away from it.
SWARM FORMATION
There are several unique formations a swarm can use, and some formations are harder to eliminate than others. For lower difficulty interceptors like the Cyclops and Basilisk, the available formations have the Thargons packed together making them easier to flak. For higher difficulty interceptors like the Medusa and Hydra variants, the swarm often adopts a ring formation making it much harder to flak down.
Agitated swarms have their own formations, with Cyclops and Basilisk swarms still being relatively straightforward to attack with flak while Medusa and Hydra swarms become virtually impossible to destroy particularly when in the “ring of death” formation.
SWARM WEAPONRY
The swarm has two weapons that it uses. When not agitated it fires projectiles that do caustic and phasing damage (this does not apply the damage over time caustic effect). These projectiles do relatively little damage to unshielded builds but can, depending on the size of the swarm, do significant damage to shielded builds. If agitated then 10-15% of the total maximum size of the swarm (or the entire swarm if the Interceptor is enraged), will turn into kamikaze missiles that have the ability to do significant damage to unshielded builds.

DEFEATING THE SWARM
The easiest method to defeat the swarm or, if the Interceptor is enraged, to control its size is to use the Remote Release Flak Launcher.
The Remote Release Flak Launcher fires a projectile that explodes when you release the trigger and incorporates a sighting system that provides an audible and visual indication of the optimum moment of trigger release and a lead indicator that although accurate when the swarm is coming directly at you is not useful once the swarm starts to maneuver (in the event that you cannot see the lead indicator, check that your Ship's Targeting Preference is set to “leading” and not “trailing” . When starting out, it is useful to have a Xeno Scanner installed as, even in passive mode, it allows you to see the number of Thargons remaining in an active swarm.
If the swarm is more than 3.5 km away, and you are facing a Cyclops or Basilisk, maneuver so that the lead indicator is in the middle of your targeting reticle and pull and hold the trigger until you see and hear the audible cues. Ideally you want to release the trigger at the same time as the cues appear and you will develop this skill the more you use the Flak Launcher. Going against a Medusa or Hydra swarm at the same range is more complicated. If their swarm is in a ring formation, a properly aimed and timed shot will simply detonate in the center of the ring and will not do any damage to swarm. In this case, rather than trying to place the lead indicator in the center of your targeting reticle, you should offset it to one side of your targeting reticle instead.
Once the swarm is within 3.5 km it will start to zig-zag and this is the point at which the lead indicator becomes less reliable. Instead, rather than trying to maneuver your ship to place it in the center of your targeting reticle you should try to predict where the swarm’s movements will take it and aim accordingly. When starting out, one approach is to aim the center of your targeting reticle midway between the lead indicator and the swarm itself and this applies equally to Medusa and Hydra swarms with the caveat that you will still need to offset your point of aim to one side of your targeting reticle if the swarm is in a ring formation.
From time to time, the swarm will retreat to rearm. When it does, don’t bother firing at it as it is extremely unlikely that you will be able to hit the target, so just wait until it recommences its chase.
INTERCEPTOR BASIC COMBAT MECHANICS

Regardless of the combat style employed, the basic combat mechanics are the same:
- combat commences, the enrage timer starts counting down.
- attack the interceptor until sufficient damage is delivered to exert a heart
- destroy the exerted heart
- avoid secondary weapon attacks
- wait for the shield to decay or destroy it
- repeat steps 1 to 5 until no hearts remain and the last shield has dropped
- do sufficient damage to destroy the Interceptor
Note that each time a heart is destroyed the interceptor will:
- deploy a shield
- look to target any ship within range (3km) to deploy a secondary weapon attack
- if the swarm was:
- destroyed, release a new swarm
- not destroyed, bank a swarm
- an Interceptor can only bank 1 swarm at any time
The types of secondary attack deployed after each heart are shown in the following table.
| Heart No. | Cyclops | Basilisk | Medusa | Hydra |
|---|---|---|---|---|
| Heart 1 | Lightning | Lightning | Lightning | Lightning |
| Heart 2 | Caustic | Caustic | Caustic | Caustic |
| Heart 3 | EMP | Caustic | Caustic | Caustic |
| Heart 4 | Caustic | EMP | Caustic | Caustic |
| Heart 5 | Caustic | EMP | Caustic | |
| Heart 6 | Caustic | Caustic | ||
| Heart 7 | EMP | |||
| Heart 8 | Caustic |
Upon death the Interceptor releases a caustic cloud that applies a caustic effect to any ship within roughly 4.5km of the remains of the Interceptor. This cloud dissipates over time (approximately 2 minutes).
COMBAT ADVICE
Firstly, note that AX combat is challenging, and when starting out in AX Combat there are a lot of things to remember and pay attention to at the same time. This section is intended to provide you with some useful advice about AX combat which is applicable no matter which “style” you choose.
SHIP BUILD ADVICE
Due to the complexity of AX combat, it is advisable to stick to the “meta” ships until you are sufficiently proficient to switch to more challenging ones. The following ship design advice should be followed no matter which approach to AX combat you will take:
- Core Internals – should be mostly A-rated. The only exceptions being Life support, Sensors and Frame Shift Drive which can be D rated to reduce weight if required;
- Hull / Armor – you want the strongest possible hull. To achieve this, typically use Military Grade Hull, and Hull Reinforcement Packages, all engineered with Heavy Duty and Deep Plating.
- Module Protection – modules, particularly in unshielded builds, can suffer a lot of damage in AX combat. Guardian Module Reinforcement Packages are an excellent way to mitigate this, but if you do not have these available, regular Module Reinforcement Packages are the next best thing.
- Heat Sinks – control of your heat is very important in most AX combat, especially when performing cold orbiting or cold reboots. Recommend using the ammo capacity engineering.
- Xeno Scanner – Useful when starting out, this scanner will passively disclose shield %, hull %, hearts remaining and if a heart is exerted. If used actively, by scanning an Interceptor (Note: can only be used up to 500m from the Interceptor), it also allows the sub-targeting of hearts;
- Shutdown Field Neutralizer – Unnecessary in solo fights where it is possible to avoid triggering the shutdown field altogether, this can be useful for wing fights as it not only protects you but any Commander within 3km of you.
You can visit the NEWP AX ship build repository.
GENERAL GUIDANCE
- If cold orbiting then instead of using a heat sink when transiting the 3km bubble around an interceptor use Silent Running
- If using a thermal vent beam laser to stay cool, don’t use it when firing your Gauss Cannons (this avoids over-stressing your WEP capacitor and adding additional heat)
- If firing all Gauss Cannons simultaneously causes your heat to spike >20% split them across both triggers and add a delay between firing one and the other.
- If you feel like you’re not doing enough damage you’re probably not staying close enough to the Interceptor (Gauss damage fall-off starts at 1.5km)
- If you are more than 3km away or at less than 20% heat and at least 800m away from the Interceptor (1000m in a large ship) it will not be able to target you, will not fire Caustic Missiles and will not trigger its Shutdown Field;
- If you are targeted by Caustic Missiles and your ship can travel faster than 350m/s just turn away and run until they self-destruct or if you have a fixed beam laser, you can target and destroy them;
- If an Interceptor triggers a shutdown field whilst you are in range and you do not have a shutdown field neutraliser, immediately turn away from the interceptor, boost and turn FA-Off (if it isn’t already);
- If the Interceptor is enraged don’t bother attempting to destroy the swarm but do reduce it in number to around 10-15 Thargons;
- Repair Limpets still work even if you have disabled your cargo hatch;
- Repair Limpets as well as AFMUs can repair a damaged, but not destroyed, canopy;
- On the out-run after taking a heart, always repair any hull damage and any damaged GMRPs or MRPs and restock any Heat Sink Launchers that are running low;
- Avoid commencing an attack run whilst repairing GMRPs or MRPs as these will be ineffective until repaired;
- You cannot launch a Heat Sink if your SYS capacitor is empty;
- If you run out of Heat Sinks but have almost destroyed a heart you can go into Silent Running to finish the job (at the expense of overheating your ship);
- If you want to collect a Thargoid Heart (which is caustic) or other materials dropped after destroying an Interceptor, wait at least 4.5km away until the integrity of one of these other materials has dropped below 50%;
- Always carry enough materials to at least be able to synthesize Heat Sinks.
COMBAT STYLES
There are essentially three main approaches to AX Combat:
- Cold Orbiting
- Stun-Locking
- Shield Tanking
Each of these has strengths and weaknesses, which the following sections will discuss in more detail.
COLD ORBITING
Cold Orbiting is extremely effective in solo and in wings and against single or multiple Interceptors. It requires you to use your thrusters to continually orbit around the Interceptor staying at least 15 degrees off its boresight whilst maintaining a thermal output of less than 20% at all times when within 3km of the Interceptor. Essentially you are flying around the Interceptor quickly and stealthily enough that it cannot bring its main cannon to bear. This is easier in FA-off but still possible with FA-on.
Once you become proficient at Cold Orbiting it is entirely possible to engage and destroy an Interceptor without taking any damage whatsoever.
Cold Orbiting build considerations:
- Speed and Agility
The Basilisk travels at 530m/s and the other Interceptors at 450m/s so speed in excess of 450m/s and ideally in excess of 500m/s is preferred. As a result, G5 engineered Dirty Thrusters with the Drag Drives experimental are used for standard thrusters. - Heat Moderation
The most efficient Power Plant you can use typically, though not exclusively, G5 Armored with the Thermal Spread experimental combined with Heat Sink Launchers and optionally a Long-Range beam laser with the Thermal Vent experimental allowing you both to save Heat Sinks for attack runs and to speed up the destruction of an Interceptor’s shields. - Damage Output
Guardian Gauss cannons for maximum efficacy typically powered by a G5 Charge Enhanced Power Distributor with the Super Conduits experimental.
Ship Meta – The Alliance Chieftain
The Chieftain is the meta for good reason. Easy to orbit with decent hardpoint flexibility and the ability to mount substantial hull and module protection whilst retaining a significant speed advantage over all but the Basilisk, there is no better ship to start AX Cold Orbit combat with. Here are some video guides on how to cold orbit:
- Complete guide to Cold-Orbiting - Thargoid Combat Tutorial
- Advanced Guide to Cold Orbiting - Thargoid Combat Tutorial
STUN-LOCKING
Stun-Locking is an extremely effective and time efficient tactic and works best in solo and wings for Cyclops, Basilisk and Medusa, less so against Hydra. This style relies on your being able to lose the race to the death with the Interceptor and requires a thorough understanding of Interceptor mechanics.
Stun-Locking build considerations:
- Survival
As the objective is to die last, the key to any build is to have sufficient Hull and Module Reinforcements such that both expire at roughly the same time. - Heat Moderation
As a significant portion of the fight will typically be in Silent Running, the key is to have as heat-efficient a ship as possible. So ideally a Low Emissions Power Plant with Thermal Spread. - Damage Output
For maximum effectiveness, a mix of Gauss or Modified Gauss, Shards, Modified Shards and Overcharged/Rapid Fire Incendiary Fragment Cannons (for shield destruction) typically powered by a G5 Weapon Focused Power Distributor with the Super Conduits experimental.
Ship Meta – The Hexashard Anaconda
The Anaconda offers significant protection, has good thermal capacity and efficiency, and with a 5F experimental weapon stabiliser can equip 6 C2 modified shard cannons. The first to stun-lock a Hydra, the Anaconda has changed the game.
SHIELD TANKING
Shield Tanking is effectively reserved for large ships like the Cutter, Corvette or Anaconda, and relies on weathering the damage from the interceptor through incredible shield strength and replenishing it through ‘cold reboots’.
A "Cold Reboot" is best performed straight after destroying a heart. Quickly bring yourself to a halt and deploy a heatsink, then use your right panel to perform a reboot / repair. Assuming you are able to do this without coming under fire then once this process has completed, your ship will come online with 50% shield, no matter what condition your shield was in prior to the reboot.
This is an unforgiving, expensive, but effective style of combat that is capable of taking on any interceptor variant but is not best suited for combat against multiple interceptors.
Shield Tanking build considerations:
- Survival
The biggest Prismatic Shield you can mount, engineered with Reinforced and the Hi-Cap experimental along with as many shield boosters as you can carry engineered with Heavy Duty and the Super Capacitors experimental. Then add in as much armor and hull as you can whilst leaving room for at least 2 MRPs. - Heat Moderation
Although you will not be cold orbiting you will still be firing Gauss Cannons and will also need to stay cold during any required shutdown and reboot sequence. In particular, you should allow for at least 1 heat sink launcher; - Swarm Control So as to be able to perform cold shutdown and reboot sequences you will need to have dealt with the swarm so at least 1 remote release Flak launcher is required.
- Damage Output
As many Guardian Gauss Cannons as you can equip whilst retaining acceptable convergence given the inherent lack of aiming mobility provided for in a large ship.
Ship Meta – The Imperial Cutter
The Imperial Cutter currently offers the greatest shield strength and highest speed of the large ships whilst still being able to mount 3 medium Gauss with good convergence, beam lasers and multiple remote release flak launchers.
FINDING INTERCEPTORS
Now that you know how to fight them, you are probably going to want to find interceptors. You can currently find Thargoid Interceptors in any of the following locations:
- Hyperdictions
- Non-Human Signal Sources of Threat 5 and above
- Certain fixed spaceborne Points of Interest such as Damaged Megaships and Distress Calls
- Certain fixed ground-based POIs such as barnacle sites and attacked settlements, including the Bug Killer site
- AX Conflict Zones which appear in systems in the Incursion state
HYPERDICTION

When travelling in and around the bubbles of Thargoid activity in the Pleiades and Witch Head Nebulae or when jumping into, or out of, a system in the Incursion state, there is a chance that you will be interdicted by one or more Interceptor whilst in Hyperspace. This chance increases to around 20% if you have ever carried a Thargoid Sensor in your cargo at any point in any ship or SRV.
NON-HUMAN SIGNAL SOURCES
Thargoids can be found at non-human signal sources starting with a threat level 3 and increasing in difficulty up to level 9. Thargoid scouts can be found at all threat levels while Thargoid interceptors can be found at signal sources with a threat level of 5 or higher.
In non-human signal sources, there will be one of three cases. For the Threat 3-4 signal sources, scouts in groups of 4 or 8 will spawn in this instance. They will often be accompanied by convoy ships or ships already engaged in combat with the scouts.
For signal sources with a threat level of 5, it can spawn either a group of up to 12 scouts, or a lone interceptor with wreckage debris surrounding that lone interceptor.
For signal sources with a threat level of 6 or higher will always feature an interceptor it is possible to have a group of 4 Thargoid scouts spawn in the instance accompanied by an interceptor that will join later on in the fight. Interceptors will also release their shutdown field attack so come prepared with a shutdown field neutralizer.
To avoid mixed, or Scout only, instances use guaranteed NHSSs of Threats 5 through 8 which are identifiable by having the following cylindrical icon

Or use the Anti-Xeno Initiative’s FSS guide to isolate non-mixed instances which involves tuning your FSS to the relevant region in the following image and then scanning the visible signals.

© Commanders Mechan, Orlandu and Xarionn, The Anti-Xeno Initiative, all rights reserved.
AX DISTRESS CALLS
A number of AX Distress Call points of interest exist both inside and outside of the bubble. As an example, there are 2 in Wolf 636 which is only 50 LY or so from Meliae. On entering a distress call instance there is a random chance of encountering one, two or no Interceptors and as they are not hostile when you enter the instance you can log out to the main menu and back in again until you obtain the Interceptor, or pair of Interceptors, that you are looking for. Unlike damaged megaships (more to follow), Scouts do not spawn at AX distress calls.
DAMAGED AX MEGASHIPS
Thargoids spawn at damaged, AX megaships and their spawning can be accelerated by fixing the damaged megaship’s hull breaches. Hull breaches can be repaired by the repair limpet after doing a primary and detailed scan using the data link scanner and then sub-targeting the repair anchor point.
Either or both Thargoid scouts and Interceptors can warp into the instance but it is possible to differentiate between them with an Interceptor’s warp making a sharp cracking sound whilst scouts register as multiple frame shift anomalies.
GROUND-BASED POINTS OF INTEREST
Thargoid interceptors will spawn at certain ground-based locations. The most popular of which is the Bug Killer crash site mentioned in the Engineering guide, but they can also appear at Barnacle sites, or attacked installations (such as Betterton Outpost in HIP 19792).
Interceptors are at their weakest near surface sites as they are unable to deploy their swarm at low altitude.
ANTI-XENO CONFLICT ZONES
Anti xeno conflict zones are persistent points of interest that only occur in systems in the incursion state. In these conflict zones, there are two main phases of the battle followed by an additional challenge after the fight. The completion of this challenge will determine if the success of the battle has a moderate or significant impact on the Thargoid presence in the system.
Phase 1: Thargoid Scouts
After accepting to ward off the incoming Thargoid threat, you will be matched with 8-12 Thargoid scouts that will spawn in the instance. Completing this phase will give you a 100,000cr bond on top of the rewards claimed by killing the Thargoid scouts.
Phase 2: Thargoid Interceptors
After completing the Thargoid scouts, waves of Interceptors will begin to spawn in the instance two at a time. The Interceptors will consist of a mixture of Cyclops, Basilisks and Medusae. The conflict zone progress bar will fill as they are destroyed. Completing this phase will give you a 5,000,000cr bond in addition to the Interceptor bonds you will have earned.
Phase 3: The Final Challenge
By this point, most ships will have left the battlefield. The final challenge will commence when a Hydra interceptor spawns at the centre of the conflict zone. The final challenge is to bring down the Hydra interceptor. At this point, you could leave the conflict zone with a moderate influence on the Thargoid presence in the system, or take down the hydra interceptor and influence the Thargoid presence significantly. Completing this phase will give you a 10,000,000cr bond on top of the 60,000,000cr bond for defeating the Hydra. If you take heavy damage from the hydra during this phase, leaving the conflict zone will not result in failure.
FURTHER READING
For further and more detailed information visit the AXI’s wiki.
Cold Orbiting Skill Development

COLD ORBITING EXERCISES
Learning Cold Orbiting is complex and time consuming. With this in mind, we list a number of exercises to be undertaken in any NEWP recommended cold orbit build using Basic Ammo that we recommend you use to practice and improve your skills.
EXERCISE #1
IMPROVING YOUR ABILITY TO FLAK DOWN THE SWARM
- Drop into an instance containing a lone Cyclops
- Aggro it by “tagging” it with your beam laser
- Boost away until it is around 6km from you then with FA-Off, flip over so that you can see the Interceptor
- Target the Swarm and destroy it using:
- Not more than 15 rounds of Flak ammunition
- Not more than 10 rounds of Flak ammunition
- Not more than 5 rounds of Flak ammunition
Notes:
- If the Interceptor gets within 3.5km of you at any point during your effort to flak the swarm turn on Silent Running and boost past the Interceptor turning SR off once it is 3km away until it is 6km away then continue to flak the swarm
- Once the swarm is destroyed, you may either take the heart and repeat the process on the next swarm or leave the instance and then repeat the exercise in a new one
- If the Interceptor becomes enraged we recommend that you leave the instance and try again as the Interceptor will release a new swarm every time the existing one is destroyed until you eliminate a heart or if none are left, the Interceptor itself.
EXERCISE #2
IMPROVING YOUR COLD ORBITING VS CYCLOPS
- Destroy the swarm
- Without boosting, orbit the Cyclops, ideally staying within 1.8km of it but no closer than 800m, using your thermal vent beam laser to stay below 20% heat.
- Continue to orbit for 3-5 reload cycles
- a reload cycle is one where the Interceptor turns away from you to reload
- Exert, take the heart and avoid the secondary effect
- Repeat until the Cyclops is destroyed.
For a demonstration:
EXERCISE #3
CONFIRMING YOUR COLD ORBITING ABILITY
- Defeat a Cyclops without using any repair limpets and:
- Retaining 50% hull or more
- Retaining 90% hull or more
EXERCISE #4
IMPROVING YOUR AMMUNITION EFFICIENCY VS CYCLOPS
- Defeat a Cyclops using only 2 medium Gauss Cannons and expending no more than:
- 60 rounds of ammunition in total
- 45 rounds of ammunition in total
EXERCISE #5
PREPARING FOR MORE ADVANCED INTERCEPTORS
- Preparing for Basilisk:
- Defeat a Cyclops using only 2 small Gauss Cannons.
- Note: the DPS of 2 small Gauss Cannons is equivalent to the DPS of all 4 when used to exert the 1st heart of a Basilisk.
- Preparing for Medusa:
- Defeat a Cyclops using only 1 small Gauss Cannon.
- Note: the DPS of 1 small Gauss Cannon is the equivalent to the DPS of all 4 when used to exert the 1st heart of a Medusa.
EXERCISE #6
AN INTRODUCTION TO FLAKLESS COMBAT
- Defeat a Cyclops, without using your Remote Release Flak Launcher
- Accomplish the same without using repair limpets whilst:
- Retaining 50% or more hull.
- Retaining 90% or more hull.
- Accomplish the same as in 2 but, using 2 medium Gauss Cannons only and expending no more than:
- 80 rounds of ammunition in total.
- 50 rounds of ammunition in total.
EXERCISE #7
AN INTRODUCTION TO MULTIGOID COMBAT
- Defeat 2 Cyclopes at the same time
- Drop into an AX Distress Call POI
- Cycle instances until you get 2 Cyclopes.
- Tag both with your beam laser and then:
- Destroy them one at a time.
- Note: the Cyclops you leave until last will likely be enraged when you start your attack on it);
- Destroy them concurrently (switching Cyclops each time a heart is destroyed).
- Destroy them one at a time.
COLD ORBITING CHALLENGES
CHALLENGE #1
In any unshielded ship BUT only using 2 medium Gauss Cannons and Basic Ammo, defeat a Cyclops Interceptor.
- Within 10 minutes.
- this is timed from the 1st shot to the combat bond being displayed in your Info panel.
- Expending not more than 46 rounds of ammunition in total.
- Taking no more than 5% hull damage including any damage repaired using a limpet controller.
Note:
You may use your long-range thermal vent beam laser for heat management and to speed up the decay of the Interceptor’s shields.
CHALLENGE #2
In any unshielded ship and in a single instance, defeat 2 Cyclopes consecutively or concurrently.
- Within 15 minutes.
- measured from the 1st shot to the combat bond being displayed in your Info panel.
- Using not more than 120 rounds of ammunition in total.
- Taking no more than 10% hull damage including any damage repaired using a limpet controller.
Note:
You may use your long-range thermal vent beam laser for heat management and to speed up the decay of the Interceptor’s shields.
IMPORTANT NOTES
- The skills you will develop by completing these exercises apply to all Interceptors
- If you find it easy to complete these try the 1st (but ignoring the ammo requirements), 2nd and 3rd exercises on the next Interceptor type
- We recommend that you avoid stepping up to the next Interceptor until:
- You can kill the current one consistently in the shortest time, taking the least damage and whilst using the least ammunition possible. For clarity, a good AX Combat pilot using basic ammunition does not need to synth Gauss Cannon ammunition for Cyclops or Basilisk and an expert one only needs to synth ammunition for Hydrae or
- You feel that the current one can’t teach you anything else of value.
- AX Combat is addictive BUT going up against stronger Interceptor types before you are ready can be intensely frustrating, lead to slower progression and risks the creation of bad habits: “Train smart, not hard” - Commander HeliMeli.