EXPLORATION
Exploration is a relatively easier and beginner friendly profession for CMDRs to start in Elite Dangerous. Exploration entails the search of valueable planets, research on exo biology lifeforms, and the visitation of many iconic known star systems, nebulae and Elite Dangerous lore points of interests.
DIFFERENT ROLES
In the Exploration profession, an explorer can take on 3 unique roles
- Bubble Explorer
- Sightseer Explorer
- Deep Space Explorer
A bubble explorer, or otherwise called short-range explorer, is a pilot who likes to discover planets, stars and other unknown things, inside the bubble. Almost every system in the bubble has been discovered and seen by other pilots and the chances you’ll find something new is close to zero. However, there are still a lot of things to discover for yourself.
- It is recommended that you start with this role until you get the hang of jumping to systems, scanning planets and exobiology before taking on other exploration roles.
- This role is not to be confused by a bubble taxi. Which is a ship with the highest jump range possible to go from A to B within the bubble.
A sightseer explorer visits discovered systems and planets all over the galaxy. They often use the codex or a 3rd party sightseeing website to plan their trip, to see things with their own eyes. All expeditions are sightseeing trips, as all the waypoints are previously discovered by other pilots.
A deep space explorer is an explorer that goes out, away from the bubble into the unknown. With only a handful of actual target systems, if any at all, in the galaxy, they go out and explore systems nobody has ever been. Using their tools to scan and map planets and stars, visited for the first time in human history.
EXPLORATION SHIP BUILDS
Here you can see suggestions for exploration ship builds.
Since 2024 there are also two ships built for exploring: the medium Zorgon Peterson Mandalay and the large Caspian Explorer. A Supercruise Overcharge (SCO) Frame Shift Drive also makes crossing large systems much faster, at the cost of extra fuel and heat.
EXPLORATION MODULES
Exploring the galaxy may seem relaxing, but can be quite deadly if you are unprepared. Stellar masses like black holes, neutron stars and white dwarfs, and planets with high gravity can make your journey difficult. To make sure your ship can handle a long journey, there are modules you have to carry:
-
Fuel scoop You will not get far without it. This module allows you to replenish the ship’s fuel reserves. This module is also necessary to do a neutron boost.
-
Shield Generator Provides a buffer if you accidently bump into foreign bodies like exo-biology life forms and prevents damage taken when landing on a high-gravity planetary body.
-
Auto Field-Maintenance Unit (AFMU) This module repairs other modules when they get damaged due to overheating your ship. An AFMU can not repair itself, therefore it is recommended to bring at least 2 AFMU modules.
-
Detailed Surface Scanner (DSS) This module allows you to map planets and obtain information about the planet’s composition.
Then there are recommended modules that are also necessary, but are not required:
-
Guardian Frame Shift Drive Booster The Guardian Frame Shift Drive Booster is a module that boosts a ship’s jump range. This module can be unlocked from Guardian Technology Brokers. The required items needed are:
- 1 Guardian Module Blueprint Fragment
- 21 Guardian Power Cell
- 21 Guardian Technology Component
- 24 Focus Crystals
- 8 HN Shock Mount A guide to unlocking this module can be found here.
-
Planetary Vehicle Hangar The Planetary Vehicle Hangar allows you to disembark in your Scarab SRV to get a closer look at the things you’ve found on the surfaces of planets. This is another way of obtaining raws if you don’t have a mining laser equipped on your ship.
-
Nomad (fighter hangar) The Nomad is a small ship-launched vessel for exobiology. Leave your main ship in orbit, fly the Nomad down, and land it on rough ground close to biological signals. See the Nomad in our Shipyard guide.
-
Mining Laser Mining lasers allows you to shoot a laser beam at several species found in Notable Stellar Phenomenae. When interacted by a thermal weapon, they will behave differently where all of its actions can be documented. A mining laser is also used to collect raw materials from asteroid belts, mostly to replenish synthesis needed for AMFU or Life Support.
-
Supercruise assist This module allows you to sit back and relax while your ship flies to a planet or other point of interest that is far away. It will automatically go into orbit of a planet, or jump you into a point of interest, such as a Notable Stellar Phenomena.
-
Repair Limpet Controller In the event where your hull gets damaged, either through excessive heat damage or were involved in a heavy collision, you can repair your hull strength with this module. Repair Limpets can also repair canopies if they are not broken.
-
Heat Sink Launcher Heat Sinks will instantly cool your ship down to the point where frost will cover your canopy. In the event where heat reaches more than 100% heat, using a heat sink can allow your ship to cool instantly, preventing module damages.
Additionally, there are further optimizations an explorer might bring to enhance their journeys:
-
Plasma Slug Weapons Weapons with this experiental are either Rail Guns or Plasma Accelerators. These weapons necessitate the most optimized jump range for exploration to reach the ship’s maximum laden jump range. Only advanced explorer will utilize this tactic for the most extreme jumps.
-
Maximizing Efficient Power Plants Running either Armored or Enhanced Low Power modifications on A-rated power plants can significantly help with your ship’s thermal loading. Although undersized A-rated power plants with overcharged modifications can also be used for exploration journeys, a more thermal efficient power plant will always be preferred over the latter.
FUEL SCOOPING
New Fuel scooping has its own guide
How to scoop without overheating, which stars you can scoop, the exclusion zone, neutron and white dwarf boosts, and who to call when you run dry.
THE GALAXY MAP
All CMDRs will have access to the galaxy map. Every star existing, known in our astronomy can be found in the Galaxy Map. The Galaxy Map will have a lot of features that can help with route planning, bookmarking, and filterable settings to make searching easier. You’ll also have access to view a system’s planetary contents when you enter that system. You cannot obtain system data in an unvisited system.
BASICS OF PLOTTING
To plot from your current position to a destination, in your Galaxy Map:
- search for the system name
- select the plot icon, highlighted in white
- remember to filter for fuel scoopable stars and select “apply to route” at the bottom
The number of jumps you will have to make will be shown in the left hand side of the navigations panel.
You can only plot so far in the Galaxy Map’s plotter feature.
- If you’re using Economical Route you can only plot up to 1,000 Light Years of range
- If you’re using Fastest Route you can plot up to 20,000 Light Years of range
BOOKMARKS
Bookmarks are a handy tool to remember a system, or to plan ahead of an expedition. You can add a bookmark to any system or planet of your choice, even stations and fleet carriers! The bookmark can be found in the bookmarks tab in your galaxy map, or as icons above the systems. To bookmark a system, select the system and click on the bookmark icon, highlighted in white.
SYSTEM MAP
When you scan and map a planet, information about that planet or star will become available to you. This information can be found in the system map. On the left hand, second tab you will find all the astronomical information about a planet. For example, the gravity of the planet, it’s surface temperature or atmosphere, its geological composition and its orbital period. You will also find its distance relative to the main star.

You might also notice two exploration badges, named “First Discovered” and First Mapped”. These exploration badges credits the CMDR that first discovered and/or first mapped the planets.
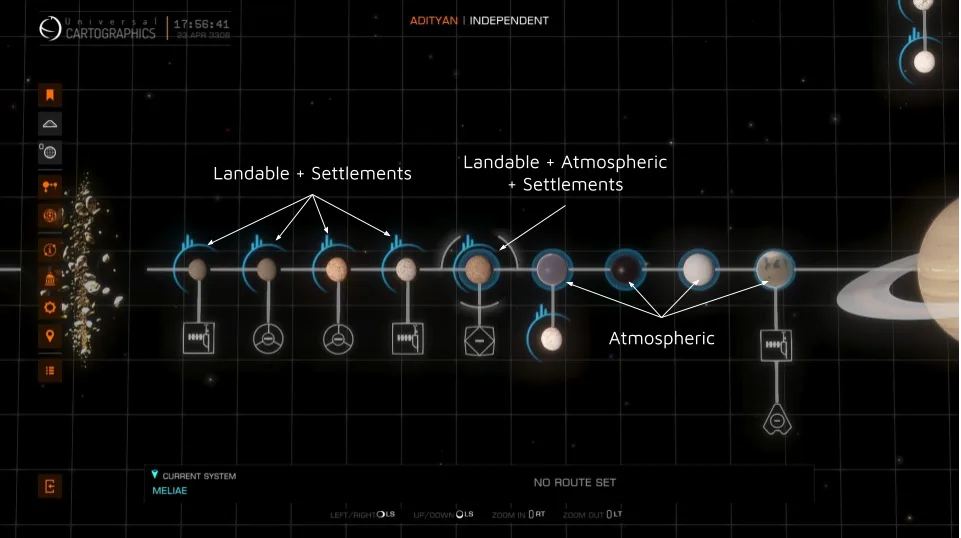
If you are exploring within the bubble, the system map will indicate planetary bodies that are landable, non-landable, has an atmospheric world, is a landable atmosphereic world, is landable with settlements.
SCANNING AND MAPPING
When entering systems, the system map will not be filled with planetary information. You are required to scan for these planetary bodies and its information using one the different methods:
- by targeting the body within 1,000 Ls of your proximity
- by Discovery Scanner
- by Full Spectrum System Scanner
- by Detailed Surface Scanner
Using the Discovery Scanner, Full Spectrum System Scanner, and Detailed Surface Scanner requires you to be in analysis mode.

DISCOVERY SCANNER
The Discovery Scanner, mostly called as the “D-Scanner” is a firegroup bounded tool that scans planets within proximity to your ship. The Scanner will emit a loud honk after completing the scan, which is why explorers also commonly refer this as “honking”. Honking will automatically reveal all stars in the system and they no longer need scanning. It will also tell you how many planets and stars (called bodies, as in celestial bodies) there are in the current system.

FULL SPECTRUM SYSTEM SCANNER
The Full Spectrum System Scanner (FSS) is built into every ship, so there is nothing to buy or fit. It works like a telescope with a radio dial: you tune into each body’s signal, zoom in on it and identify it from where you are, without flying there. It only works in supercruise.
New Practise the FSS
Learn the screen in our FSS Simulator, then honk, tune, zoom and scan a made-up system right in your browser.
THE FSS, STEP BY STEP
- 1. Get clear of the star Stars can hide smaller bodies behind them. Fly away from the arrival star for a few seconds before you slow down. Point your nose at empty space: even with the throttle at zero you keep drifting at about 30 km/s while you scan.
- 2. Honk, then throttle to zero Switch to analysis mode and hold the Discovery Scanner button until it honks (you can also honk from inside the FSS). Then set your throttle to zero.
- 3. Open the FSS Press your Enter FSS key. Bind the exit key too, or you will have no way out. The percentage at the bottom left shows how much of the system you have discovered; the honk already counts every star.
- 4. Read the band The bar along the bottom (Filtered Spectral Analysis) shows a wave for every body you have not scanned yet. Signal sources and small rocky bodies sit on the left, water worlds and Earth-likes in the middle and gas giants on the right. The type under your white tuning line is named at the bottom right, and blue patches in the view show where the signals are.
- 5. Tune and aim Move the tuning line onto a wave and sweep the reticle across the blue patches. When you get close, chevrons appear around the reticle and a dashed circle marks the body. When the tuning is exact, the circle turns solid.
- 6. Zoom in and wait Zoom in on the circle and keep it in the centre until the scan finishes. The body’s details then appear: its type, surface materials, any signals on the surface under Locations, and who discovered or mapped it first. Its wave disappears from the band.
- 7. Clear the band Repeat until the band is empty. “System Scan Complete” appears once every planet and moon is scanned. That is also all the full-scan bonus needs. Asteroid belts are not bodies and count for neither, so you can ignore them. If belt clusters clutter your view, scan one: that reveals all the nearby ones, so the real bodies are easier to pick out.
- 8. Pick what to map Leave the FSS and open the System Map to see what you found. Fly out with the Detailed Surface Scanner (below) only to the bodies worth mapping.
Tip: Practise it before you fly: our FSS Simulator walks you through the screen, then lets you honk, tune, zoom and scan a made-up system.

Where each type of body sits on the band:
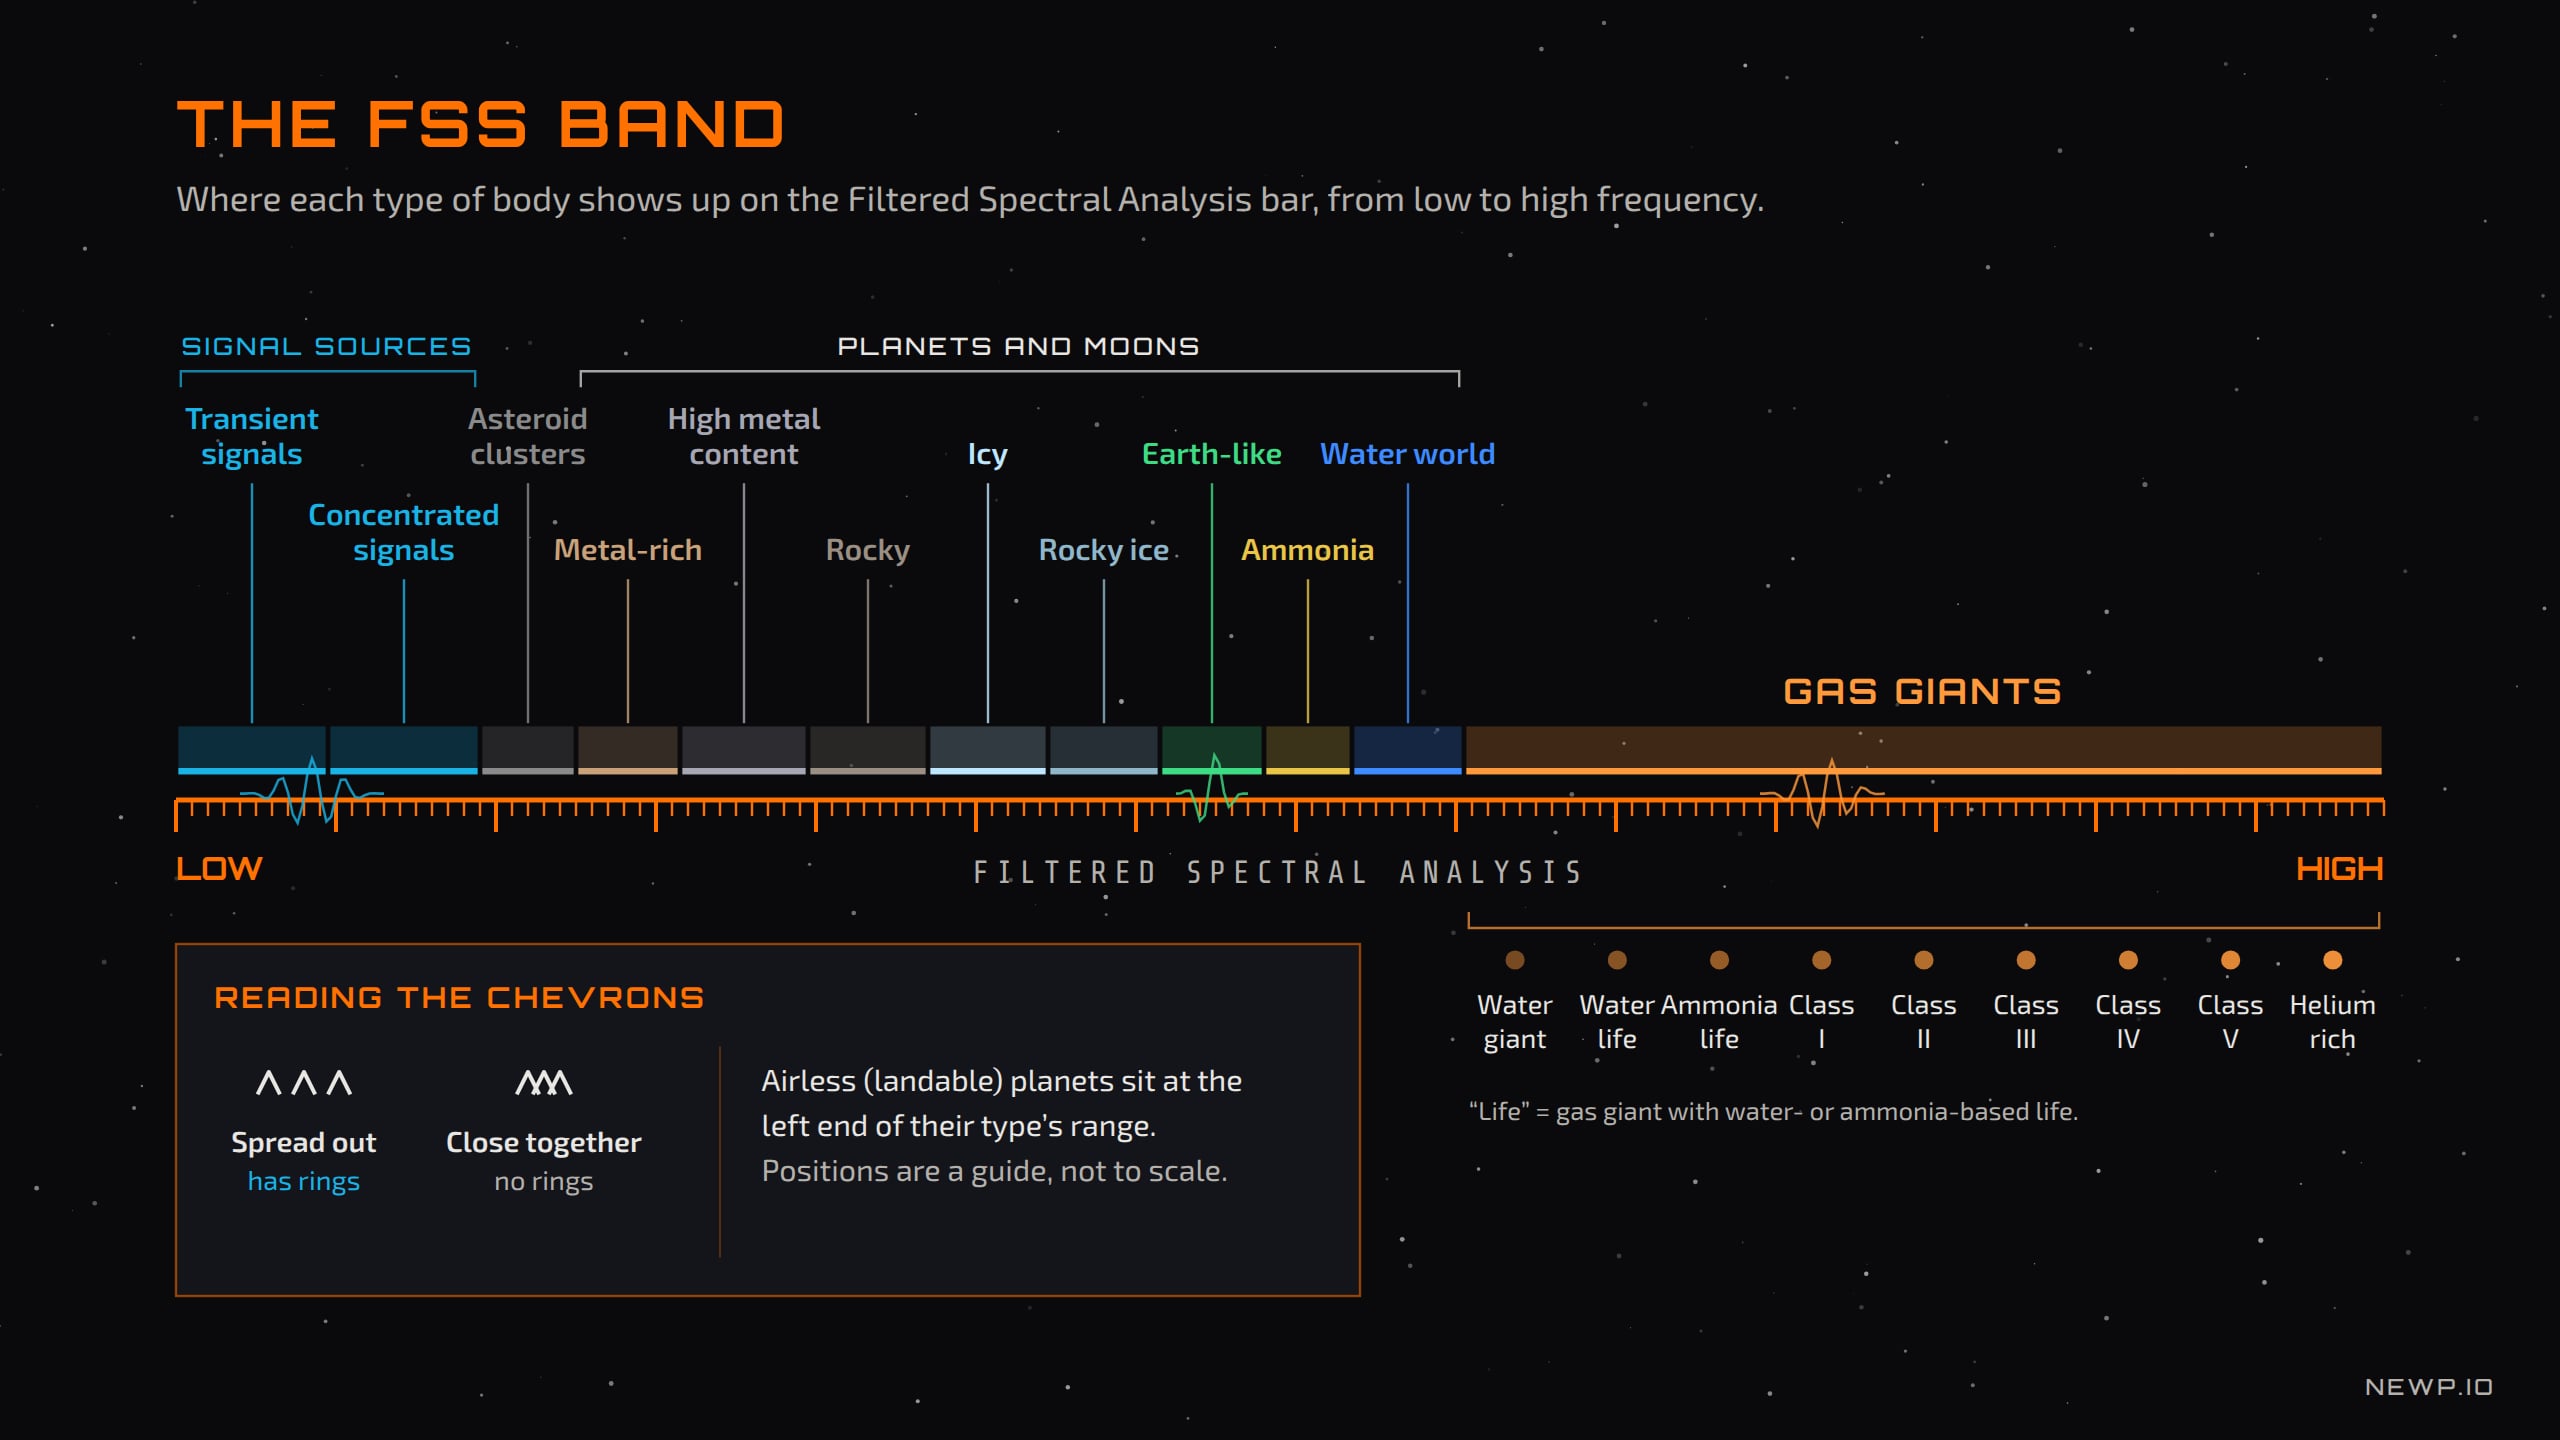
Tip: Stations, beacons and other signal sources also show up in the FSS. You can zoom in on them and select them as a nav target, but you do not need them for System Scan Complete.

Warning: If the FSS will not open, check all three: analysis mode, supercruise and throttle at zero. Check your FSS keys on our Keybinds page.
Which bodies are worth mapping, based on the values in the table below:
- Map these
- Earth-like worlds
- Water worlds (terraformable or not)
- Ammonia worlds
- Terraformable HMC and rocky bodies
- Often worth it
- Metal-rich bodies
- Class II gas giants
- High metal content bodies
- Scan only
- Rocky and icy bodies
- Most other gas giants
Any body whose Locations line shows biological signals is worth mapping if you hunt exobiology, whatever its type: mapping marks where the sites are. See our Odyssey Exploration guide for sampling them.
DETAILED SURFACE SCANNER
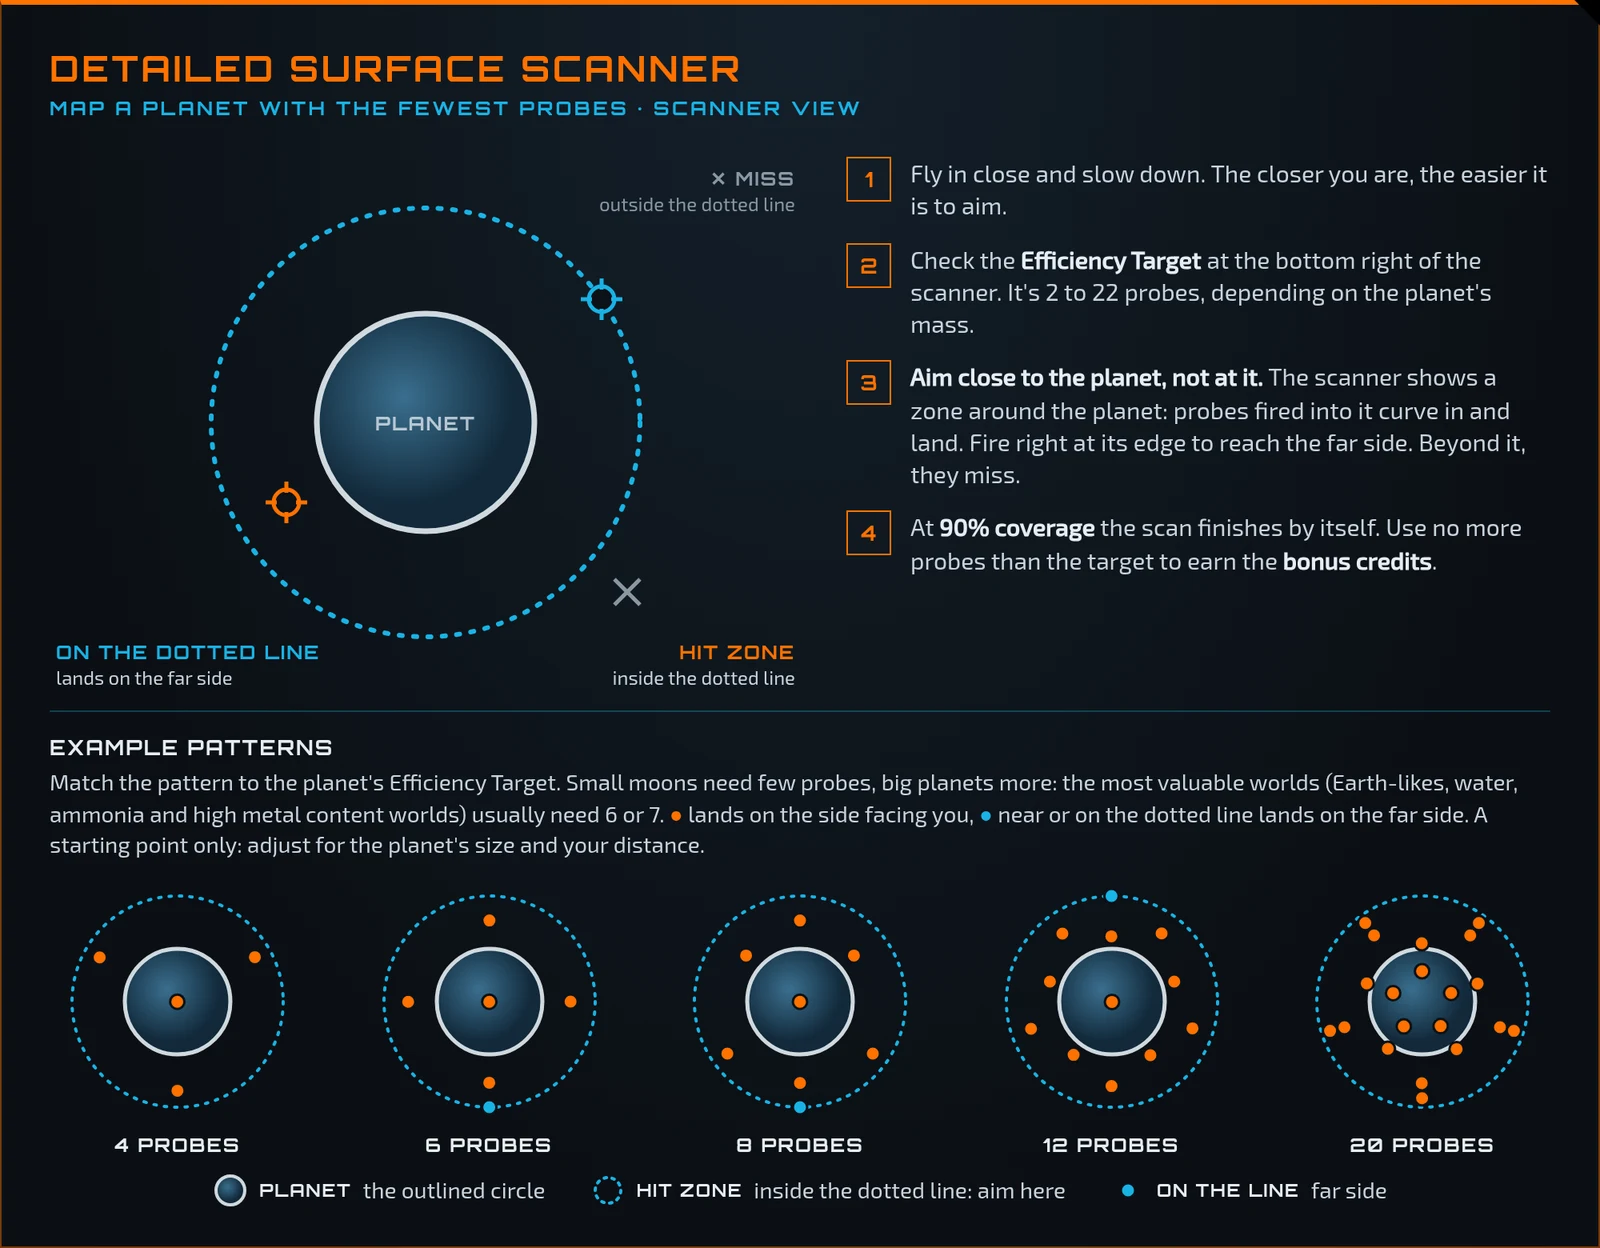
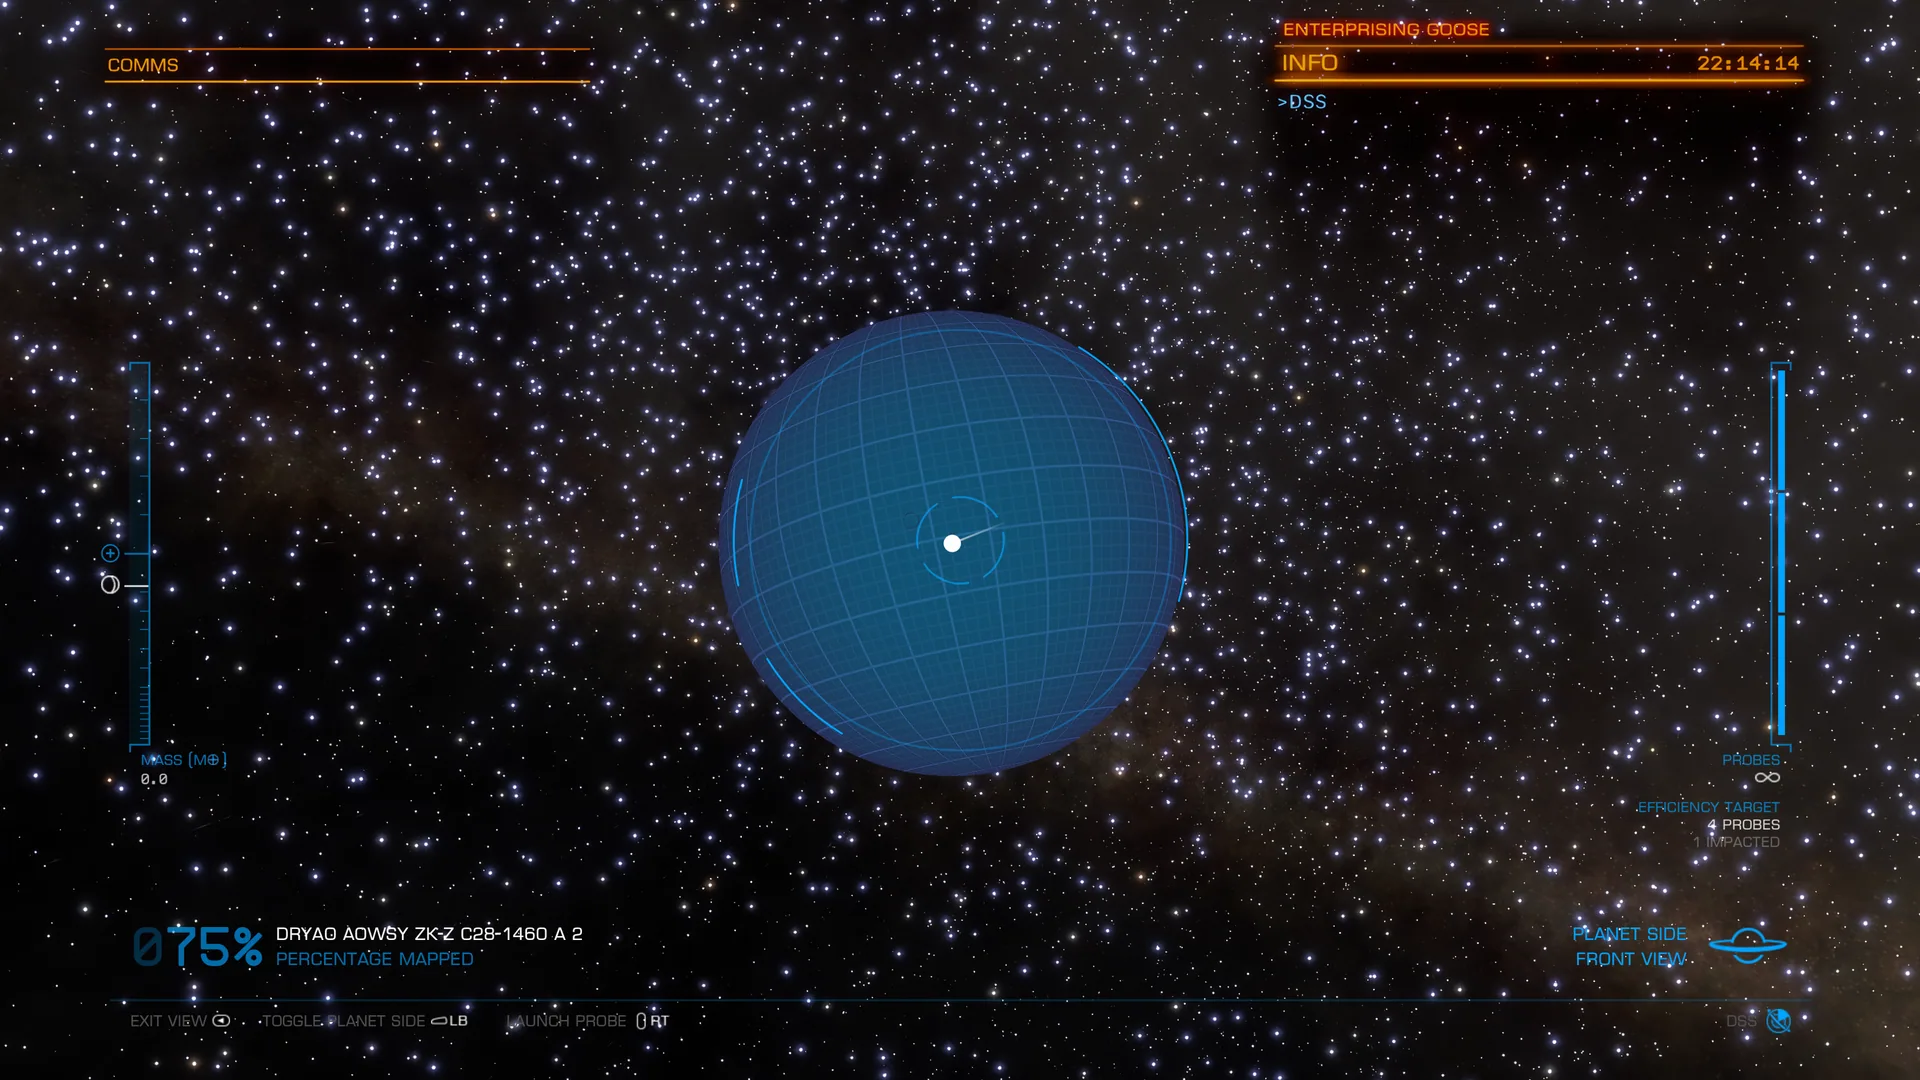
To map a planet, fly closer to a planet and activate the Detailed Surface Scanner (DSS). The DSS allows you to fire probes at a planet to reveal even more information, such as settlements, volcanic activity or even biological points of interest. Aim the probes all around the planet using gravity and scan it to 100%. You have to be idle in supercruise to be able to use this module, so throttle down to 30.0 km/s.
To make a bit of extra cash from your surface scan, fire no more than the amount of “Efficiency Target” probes. You can find the information on the bottom right of your screen in the DSS. Different planetary masses require different amounts of probes to obtain the Efficiency Target.
If you’d like to know how many credits you can earn by scanning, have a look at this infographic. This infographic assumes you hit the efficiency target successfully.
- FSS — Full Spectrum System Scanner
- DSS — Detailed Surface Scanner
- FD — First Discovery, this means you are the first to ever see or probe it
| Planet Type | FSS | FSS+DSS | FSS+FD+DSS |
|---|---|---|---|
| Earth-like World | 270,000 | 1,100,000 | 3,200,000 |
| Terraformable Water World | 270,000 | 1,100,000 | 3,200,000 |
| Terraformable HMC | 160,000 | 680,000 | 2,000,000 |
| Ammonia World | 140,000 | 600,000 | 1,700,000 |
| Terraformable Rocky Body | 130,000 | 540,000 | 1,600,000 |
| Water World | 100,000 | 420,000 | 1,200,000 |
| Metal Rich Body | 30,000 | 130,000 | 380,000 |
| Class II Gas Giant | 28,000 | 120,000 | 340,000 |
| High Metal Content | 14,000 | 60,000 | 170,000 |
| Class I Gas Giant | 3,800 | 16,000 | 46,000 |
| Class IV Gas Giant | 1,100 | 4,700 | 13,000 |
| Class III Gas Giant | 1,000 | 4,000 | 12,000 |
| Class V Gas Giant | 1,000 | 4,000 | 12,000 |
| Helium-Rich Gas Giant | 900 | 3,800 | 11,000 |
| Gas Giant w/ Water-based Life | 880 | 3,700 | 11,000 |
| Water Giant | 670 | 2,800 | 8,000 |
| Rocky Ice Body | 500 | 1,800 | 5,100 |
| Ice Body | 500 | 1,600 | 4,500 |
| Rocky Body | 500 | 1,500 | 4,300 |
FINDING EARTH LIKE WORDS
As you probably can tell, First Discovered, Detailed Surface Scanned and Full Spectrum System Scanned Earth Like Worlds yield the most amount of credits to an explorer. There is an easy way of searching for Earth Like Worlds in the black. Generally A type stars, specifically A7 through A9 type stars offer the best chance of finding Earth Likes, however set a filter for F type stars as those offer the highest chances.
Each star system in the procedural generation creates a string of letters and numbers that actually means something.
- Praea Ain MA-A D 1160
The bold and italicized letter is called the system mass code. It goes from A (least massive) to H (most massive) and denoted the TOTAL mass of the system. Most main sequence star types fall into a single mass code, specifically F-type stars are NEARLY ALL mass code D. The exception here is G-type stars which split roughly 50-50 between mass codes C and D. Here’s a dataset containing the distribution of mass codes and star types.
Finding good places to explore
Choose a goal: first discoveries, valuable scans, or scenery. In the Galaxy Map, filter by star class and open candidate systems in the System Map. Check body details for landability, gravity, atmosphere, pressure, and orbital data.
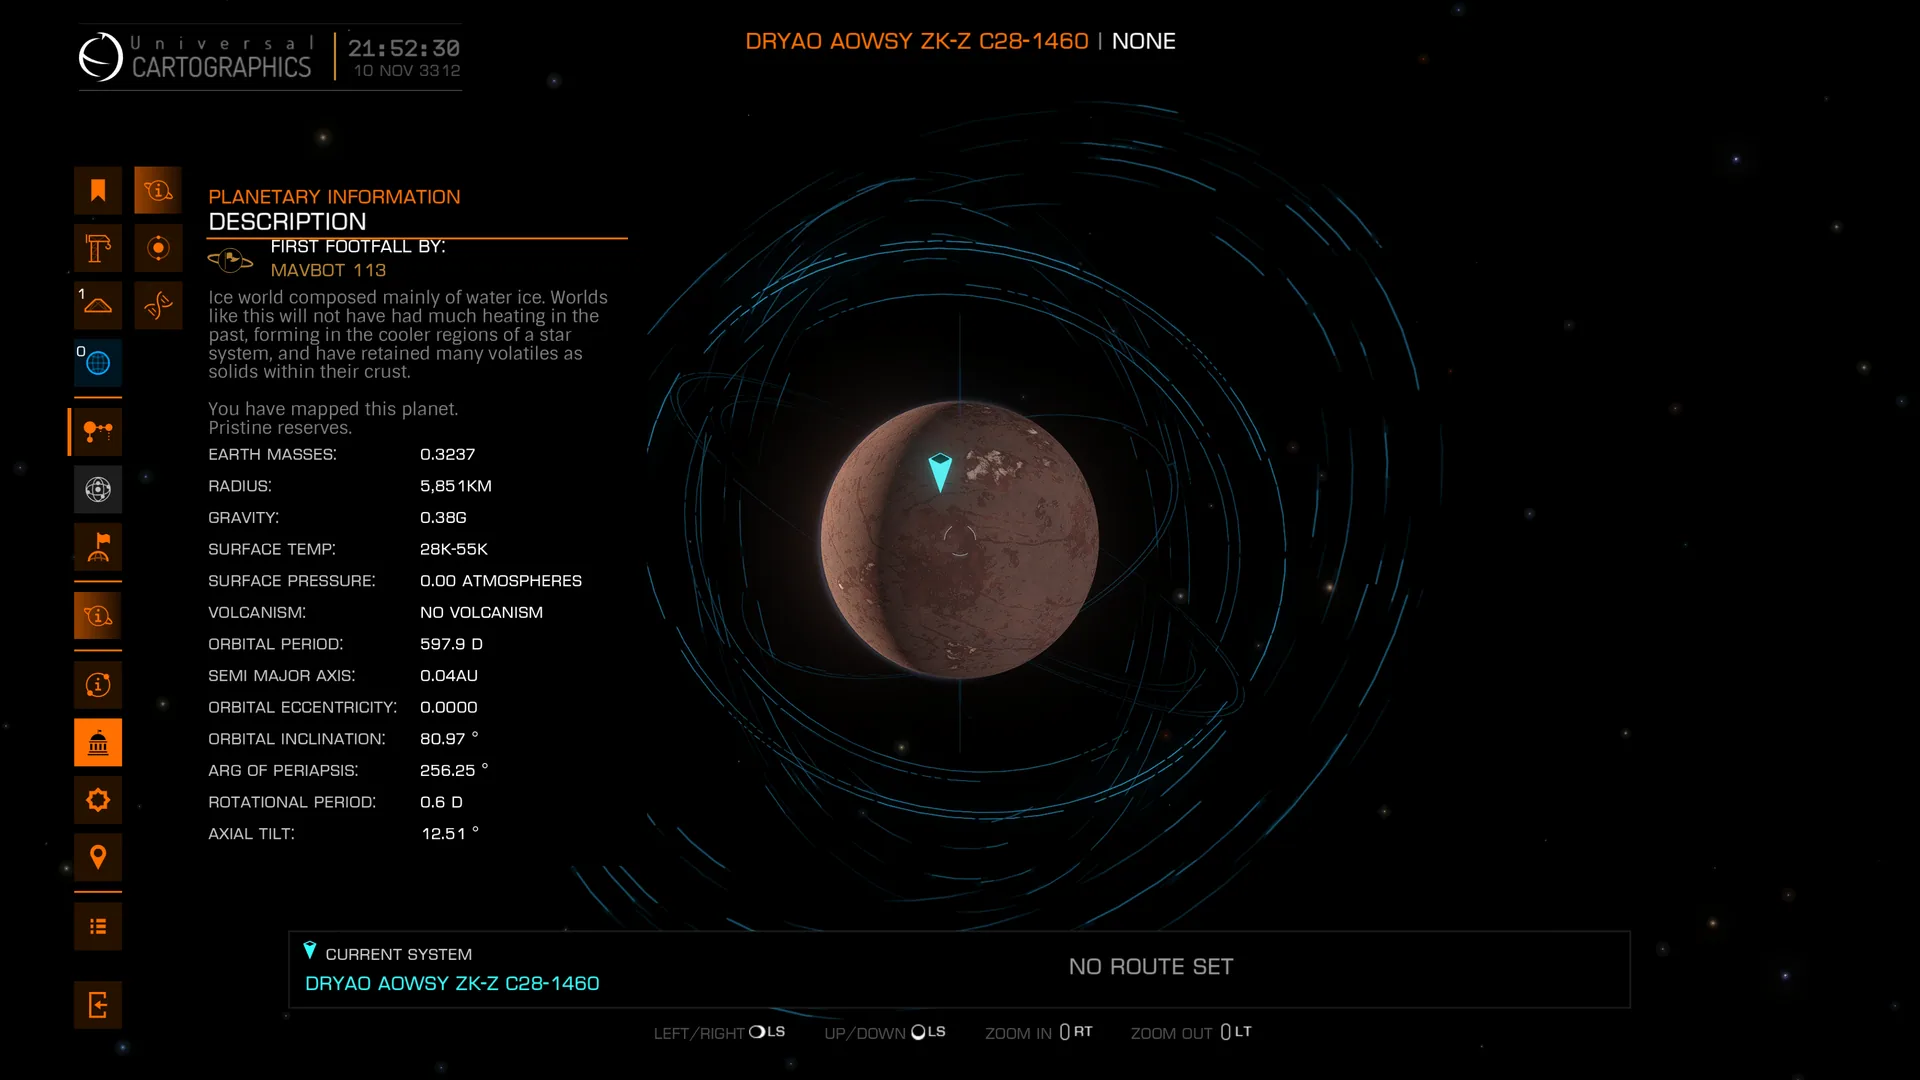
For scenery, look for ringed worlds, close binaries, moons near giant planets, or nebula backdrops. Use the Orrery to compare orbits and distances. The Planetary Map shows broad surface features, but it does not guarantee smooth landing terrain.
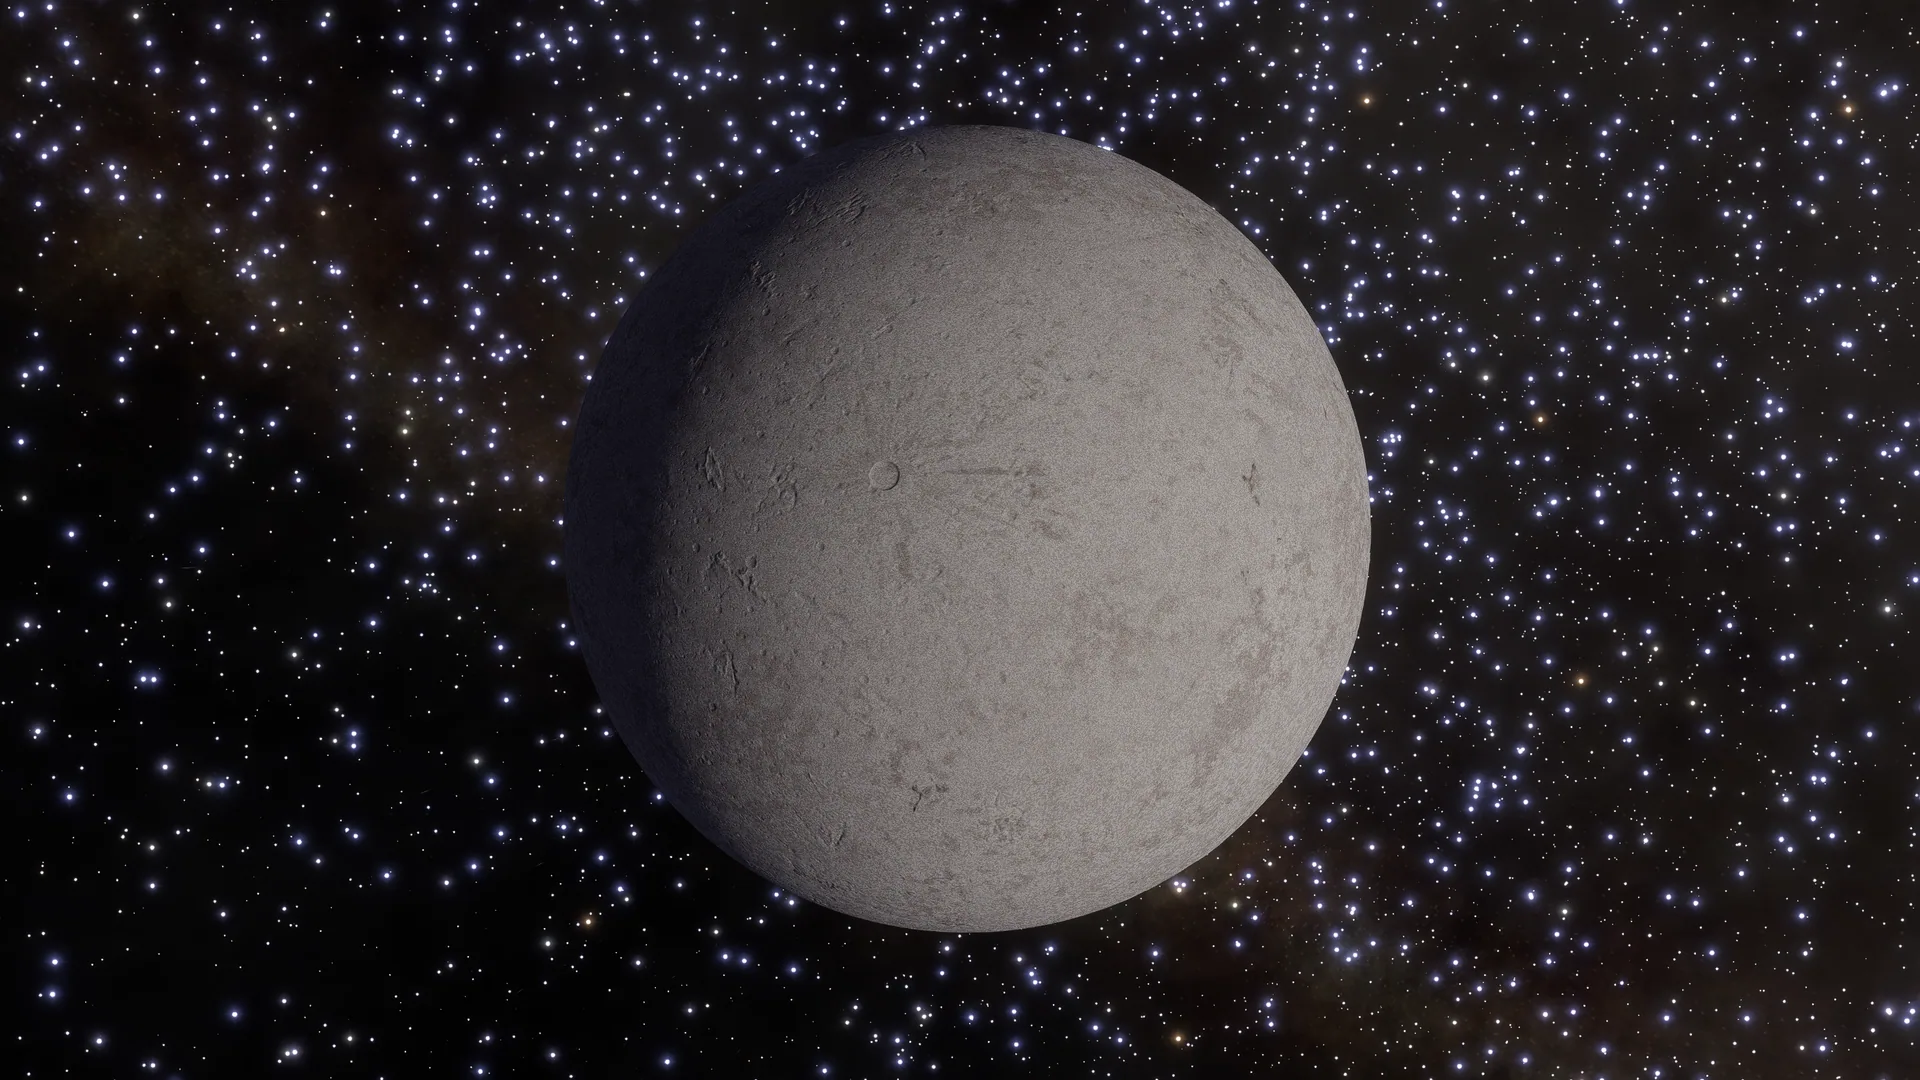
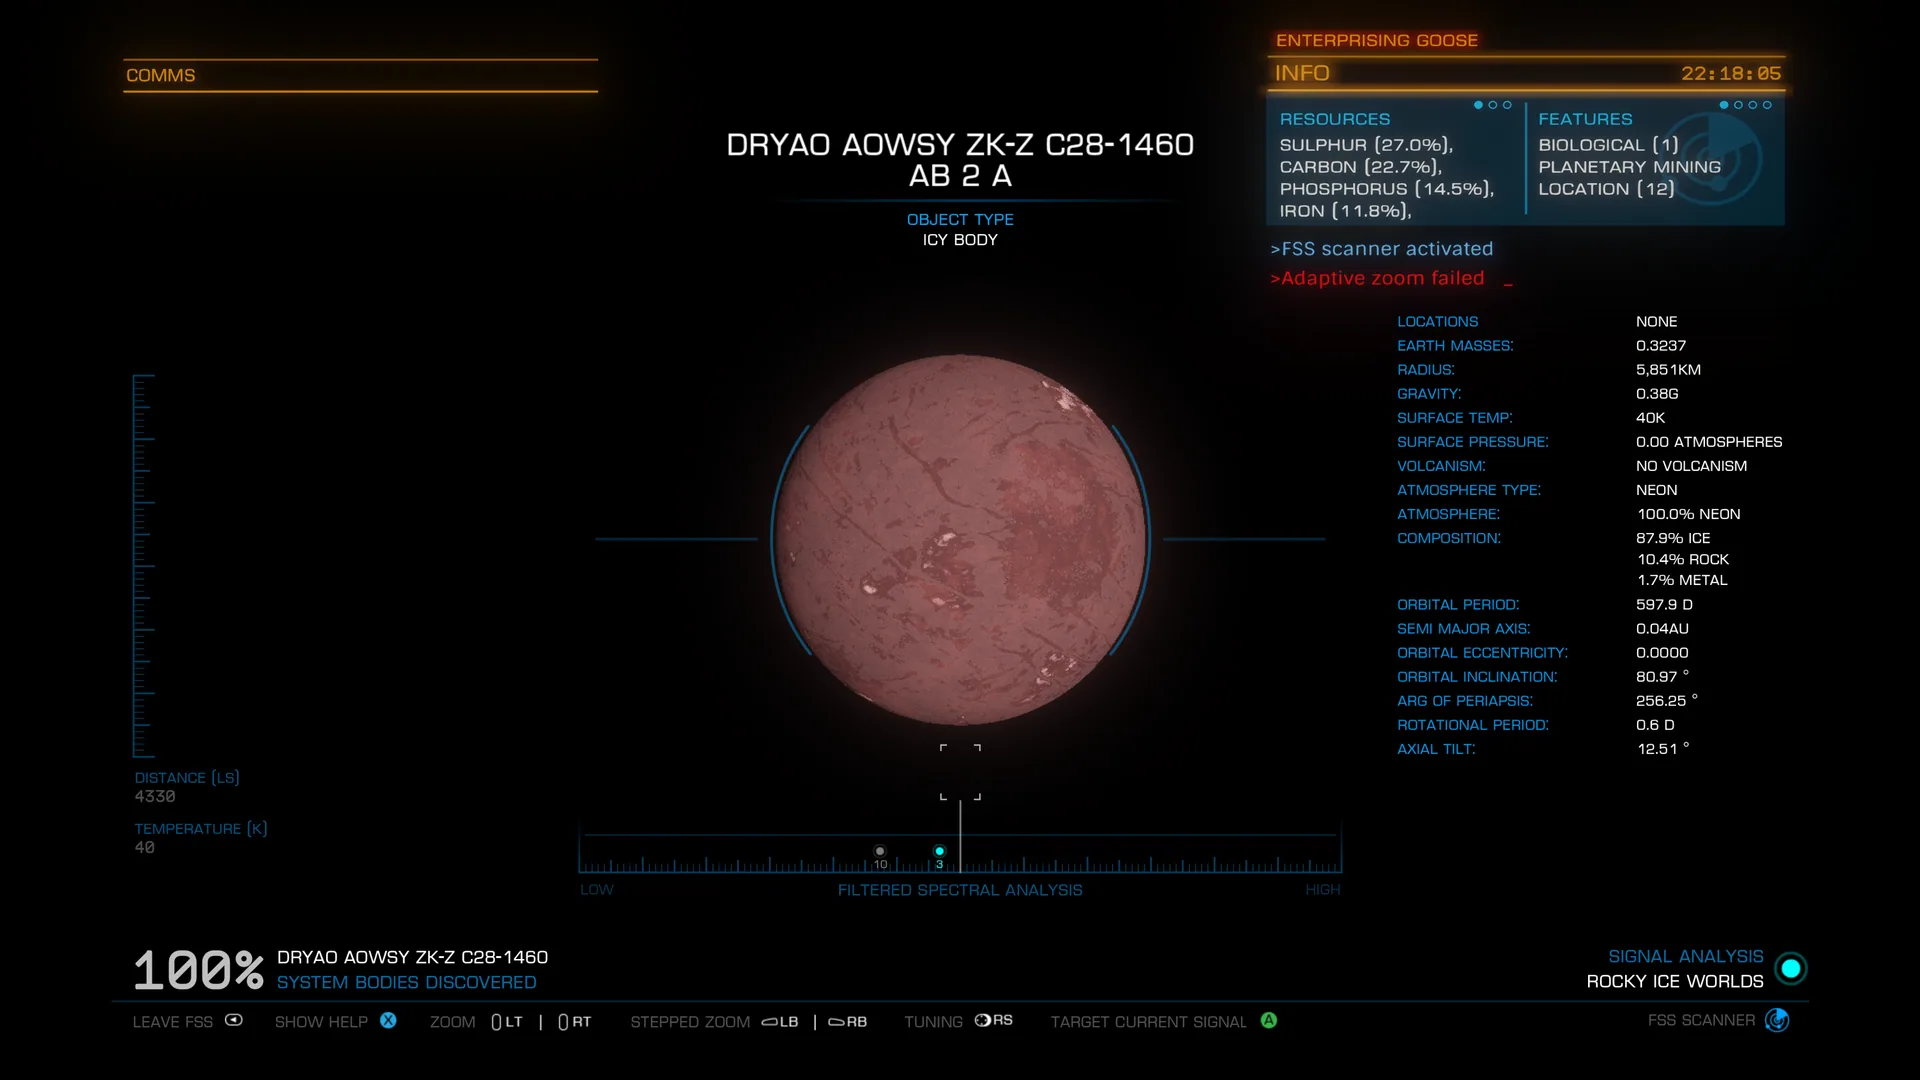
From supercruise, the FSS resolves bodies and signals. Check Locations and body details for biological or geological signals. Use the DSS to map candidate worlds and reveal surface points of interest.
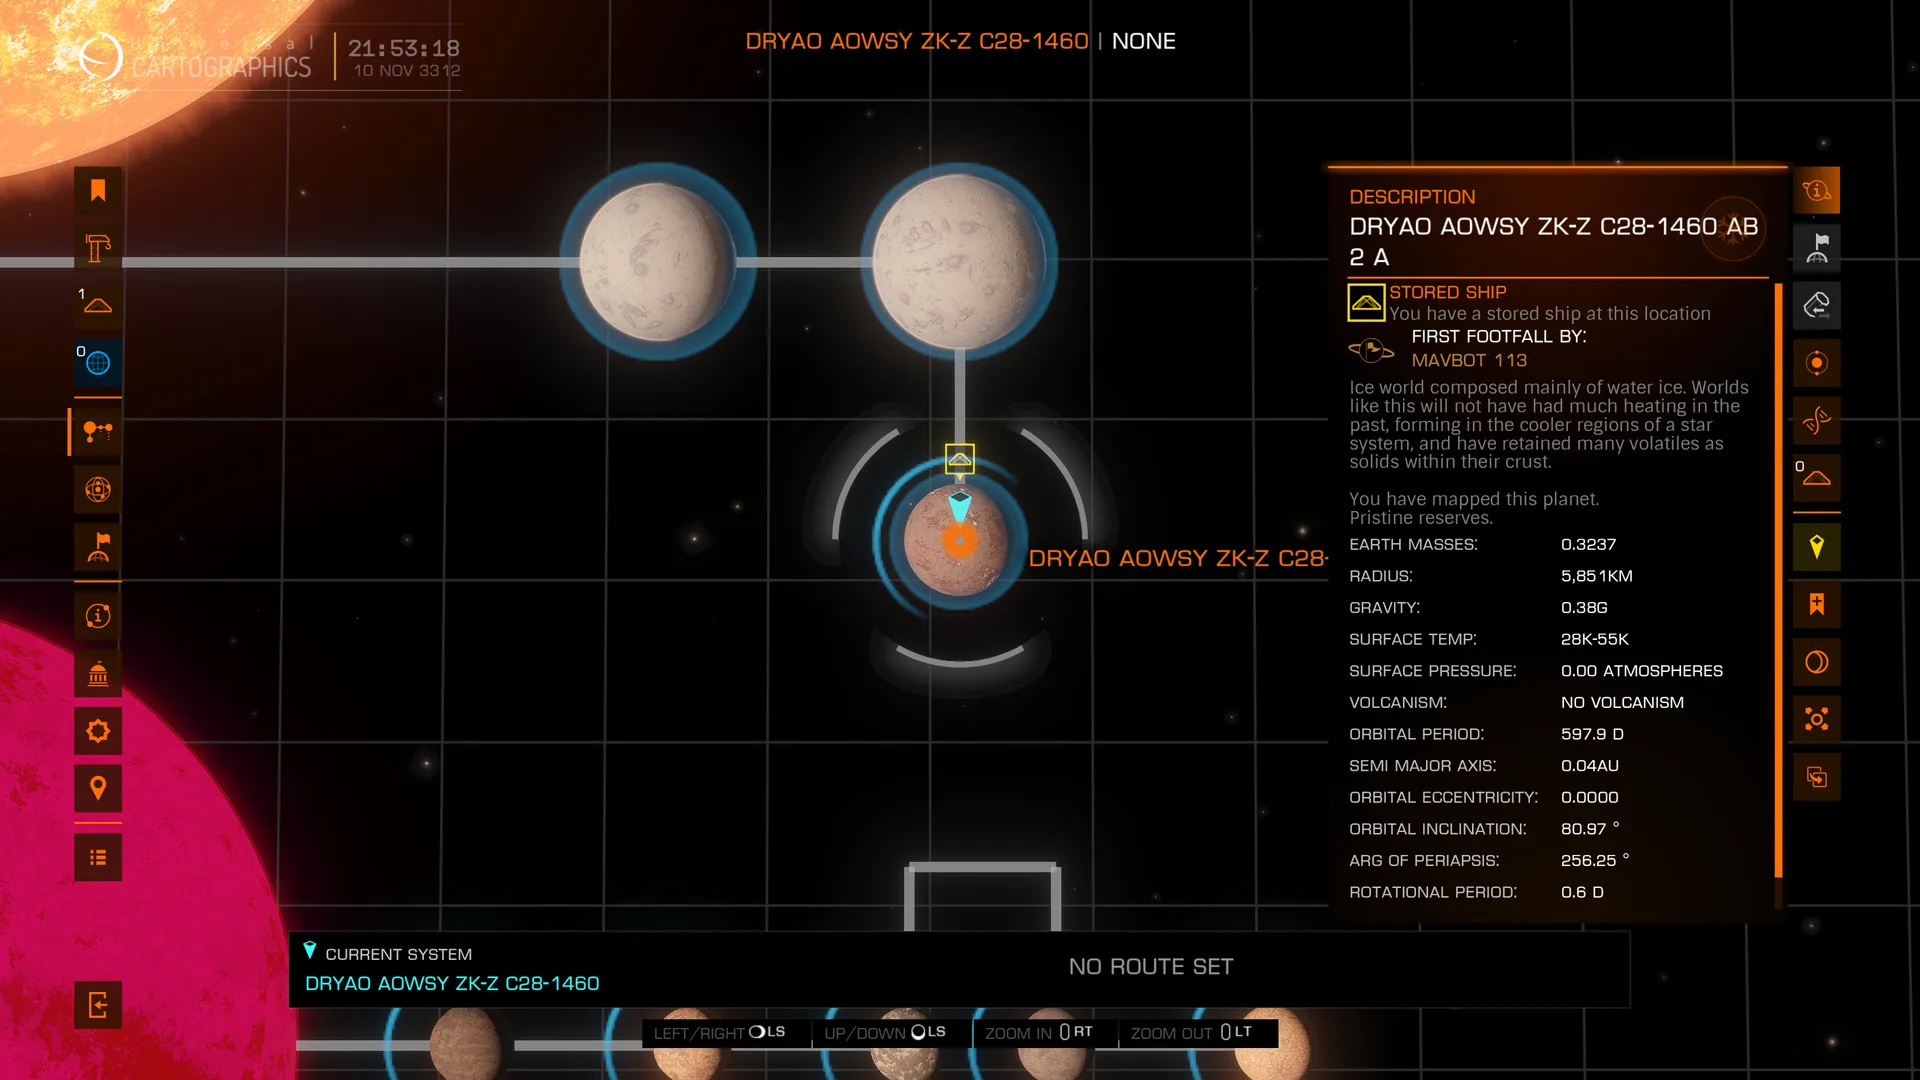
First Footfall is recorded when you first disembark on an eligible, unclaimed landable body. The Commander’s name appears in that body’s System Map details. Selling exploration data does not trigger it.
A honk gives the quick system baseline. FSS scans and DSS mapping add cartographic value, as shown in the FSS and FSS+DSS values table.
For Spansh route plotting and neutron routing, EDSM, and Codex tools, see our third-party tools guide. The in-game Codex tracks regional discoveries. EDCodex is a community index of tools and references.
THE CODEX
The Codex is a collection of your game statistics, game discoveries, and in-game guides and lores to help you with your journey. The codex has a lot of information about:
- Commander information about you and your game statistics
- Discoveries all discoveries found around the galaxy, divided into 42 galactic regions.
- Knowledge Base all knowledge about the empire, federation, thargoids, raxxla etc.
- Pilot’s Handbook all useful information about careers, maps etc.
THE COMMANDER
The Commander section is divided into three sub-sections:
- Session Log The session log keeps track of your current play session’s jumps, discoveries, sales, material gathering.
- Stats The stats section has all the stats about your commander’s progression.
- Archive The archive holds all scanned data from tourist beacons, data links on megaships and settlements.
DISCOVERIES
The discovery section is a collection of reported and confirmed discoveries found within their own galactic regions. An interactive map will show what sorts of exobiology lifeforms, planetary body masses exists in that region. The discoveries list will show up to three sections:
- Astronomical Bodies Astronomical Bodies discoveries include Stars, Gas Giants, Terrestrial Planets.
- Biological and Geological Biological and Geological discoveries include Geology, Anomalies and Organic Structures.
- Xenological Xenological discoveries include discoveries of Guardian and Thargoid related structures.
KNOWLDGE BASE
The Knowledge Base section will have historical documentation of the main superpowers, other races of species, major industrial corporations and independent factions like the Dark Wheel and Raxxla.
PILOT’S HANDBOOK
The Pilot’s Handbook is a collection of mini in-game guides and information packets to help the player progress in Elite Dangerous covering:
- Mining
- Piracy
- Mercenary Work
- Xeno Hunting
- Maps
- Fleet Carriers
- Exploration
- Trade and Smuggling
- Bounty Hunting
- Salvage and Rescue
- Crime and Punishment
THE SURFACE
In Horizons, you have the ability to access landable planets and explore the planet’s surfaces. In Odyssey, you have the ability to visit planets with tenuous atmosphere. There exists multiple organic structures that can be found, researched and explored throughout the Elite Dangerous universe.
GLIDING AND LANDING
To be able to land on surfaces of planets either to disembark on foot or explore on surface recon vehicles (SRV’s) you will need to perform a glide before finding a suitable area to park your ship. To successfully perform a glide, you must maintain an angle of descent between 5º to 60º degrees.
You’ll know a couple of things that’ll show on your altitude meter when you start to glide:
- OC (Orbital Cruise) This indicates the level where it is safe to orbit the planet, this is the uppermost layer of the planet’s exclusion zone area
- DRP (Drop Level) At this level, the ship will drop from supercruise and enter a glide
You’ll also notice a bar on the right side of the HUD as well as coordinates, a heading and the planet’s gravity indicator.
- The Descent Bar This bar indicates the rate of ascent or descent of your ship. Too fast of a descent will force you out of the glide.
- Coordinates & Headings Just like aviation here on Earth, you’ll be given a set of coordinates and a heading to locate your position.
- Gravity Every planet will have a different gravitational reading, all measured in relation to earth’s gravity, 1 G is one earth gravity. Make sure to perform a shallower glide if the gravity is higher than 1 G. On high G landing, you may have to use your main thrusters to slow down your ship’s rate of descent.
When finding an area that’s relatively flat so your ship can land, use the minimap to help guide you to a flat area. The minimap will only change when you have your landing gear deployed. When there is a suited area to land, the indicator of your ship will illuminate. Steady your ship and land. In Odyssey, the auto docking feature can assist you to auto land on planetary surfaces.
PILOTING THE SRV
There are two Surface Recon Vehicles accessible to be used to roam on surfaces of planets. The SRV Scarab and the SRV Scorpion, only available to Odyssey CMDRs. To disembark into your SRV, select the SRV hanger and deploy it.
Now you’re in your SRV. There are some things to note when you are driving the SRV:
- the cluster HUD is similar to your ship’s HUD
- you have only one tonne of fuel
- moving away from the ship will allow you to use the SRV’s boost and turret
- you have a radar scanner on top of your minimap to scan for nearby anomalies
You can also use the camera in the SRV’s turret, called Turret Mode. In Turret Mode view allows you to view 360º around your SRV, like a tank. You can use the turret to shoot your Dual Plasma Repeaters or scan objects with your Composition or Data Link scanners.
There are some behaviours your ship might do:
- if you are too far from your ship, it will disembark
- you can recall and disembark your ship at your command
- you can board back onto the ship while it either has landed or hovering above the ground.
To return to your ship, drive under the SRV hatch, which is marked by an orange hologram on the underside of your ship. When you’re under the hatch, the Board Ship light will be on. You can find this on the bottom right of your HUD. Select Board Ship to board your ship. You can also transfer cargo from your SRV to your ship and vice versa using the Transfer Cargo option.
ENGAGING THRUSTERS
To engage your engines after you’ve landed, all you need to do is to press your upward vertical thrusters. After holding it, you’ll be discharged from the ground and are now able to fly off elsewhere. To engage supercruise, you need to leave the planet’s mass lock zone, which is generally 2 - 3 km from the surface, and be faced above a 40º pitch angle to safely wake out of the planet.
COLONISATION
Since the Trailblazers update (February 2025), explorers can also push the bubble outwards. Frontier’s System Colonisation guide has the details. In short:
- At a station, talk to the System Colonisation Contact. Pick an unpopulated system within 15 ly of populated space and pay to register your claim. The claim holds for 24 hours.
- Fly there and deploy the colonisation beacon with the System Colonisation Suite, which every ship now has. That makes you the System Architect.
- A System Colonisation Ship arrives, and commanders haul in the commodities needed to build the first station or outpost.
- Once it is built, the system becomes populated and you can plan more facilities.
OTHER RESOURCES
-
EDSM (Elite Dangerous Star Map) A fantastic website offering a huge amount of information on the Galaxy.
-
ED Astrometrics Ever wondered where in the galaxy everyone is, or what places haven’t been explored? The Astrometrics website provides maps of the galaxy showing everything we know about the galaxy through a lot of different lenses.
-
Spansh Spansh is a route plotter for traversing the galaxy. You can use it to work out the best way to get across the galaxy using Neutron Stars, or maximise the money you make exploring known regions, or helping you plot your fleet carrier journey efficiently. To see how much Tritium a carrier jump burns, try the Fleet Carrier Calculator.
- Scenic Route Finder A website with a Scenic Route Finder. A handy tool to help prepare a route or an expedition.