Missions
This page is intended to provide a brief guide on how to perform every different type of ship-based mission in Elite Dangerous. Note that while these guides are broken down into sections, there may be some mixing between sections. For example, you may be performing a passenger mission and offered a bonus for killing someone who is hunting your passenger, or need to scan a datapoint to get a location for a pirate, information will be provided on these where relevant.
Table of Contents
- The Basics
- The Pay
- Types of Missions
- Combat
- Transportation
- Freelance
- Operations
- Support
- Operations
- Passenger Missions
The Basics
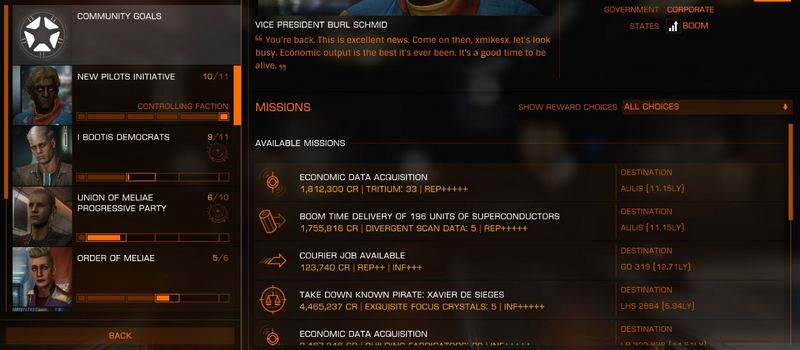
A mission is a job that a particular faction wants completed, you’ll find a list of the missions being offered by each faction present in a system on the mission board at every station in that system. The mission boards are updated every 10 minutes, each time resulting in some mission being removed and some new ones being added.
Any mission you take must be completed at a mission board in a station. Usually, this will be the board from which you acquired the mission. The exception to this is the delivery missions, where you are taking goods from A to B, in these you hand in at the mission board in the destination station.
All missions have different variations depending on the states of the factions. For example, instead of offering Delivery missions they may offer Boom Time Delivery missions, or Famine Prevention Delivery missions etc.
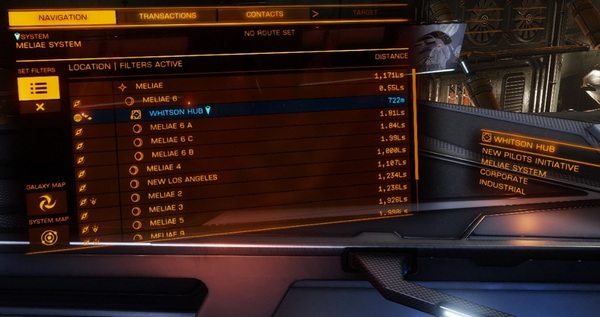
No matter what type of mission you are performing, you will find more information about it on your left panel, on the transactions tab. Opening the details of a mission from the screen should show you everything you need to know about the mission.
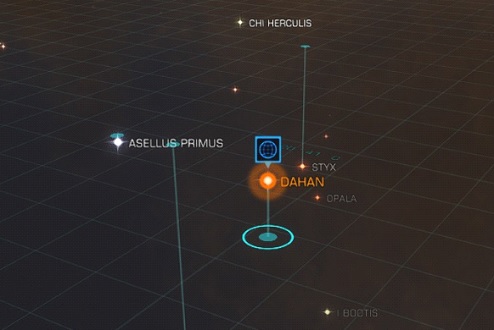
Once you have taken a mission, you will find blue indicators to help you find where you need to go next for that mission. For example, on the galaxy map you will see this blue planet symbol to indicate the next destination for your mission.
Meanwhile, your nav panel will highlight the relevant body or station in blue.
The Pay
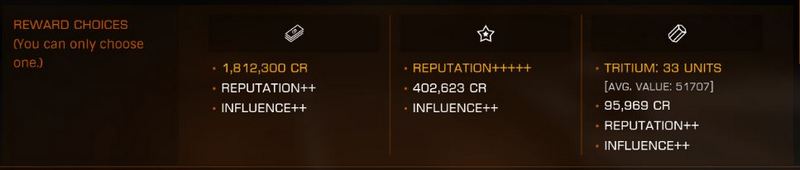
Each mission will offer you a choice between 3 different payments. These will offer you some mix of the following rewards:
- Credits
- Engineering Materials
- Commodities
- Improve your Reputation (REP) with the mission giver
- Improved the Influence (INF) of the faction in the system
Which reward you choose depends on your objectives at the time.
Having a better reputation with a faction will give you access to more missions, and will increase the rewards they offer for performing each mission as well. As a result, if you are intending on staying in a particular system for some time, it is often worthwhile to increase your reputation with each faction up to Allied to maximise your rewards from missions.
It is possible to take multiple missions at a time (often referred to as “stacking”), but there are some limitations to this. Firstly, you can only take 20 mission total at any one time, there are also limits to how many of specific types of missions you can take at a time (ie you are limited to 3x skimmer kill missions).
Finally note that there are rules about the way that missions stack, for example if two different factions give you a mission to kill targets pirates in the same system, then each kill will count for both missions. However, if you take two missions to kill pirates from a single faction, each kill will only count for one mission.
Types of Missions
There are 5 main types of missions:
- Combat
- Transportation
- Freelance
- Operations
- Support
The following sections of this guide are broken down by the different main categories of missions.
In many cases missions are available both as wing missions (which can be shared with others in your wing) or as solo missions. Wing missions are typically scaled up versions of the solo missions, requiring you to transport more goods, kill more targets etc. The payoff for this increased effort means that wing missions often pay a little better, but also that each person in the wing receives the full payment for the mission.
Note that for all mission times I have assumed short supercruise times say 2 minutes per destination to avoid the length of the supercruise masking the duration of the mission activities themselves.
Combat
All combat missions are based on the same principle, find the target/targets, and destroy their ships.
Kill Pirates from a particular faction (Pirate Massacre)
Summary – Kill a specific number of criminals from a particular faction.
Expected Time – 8-90m
Method - jump to the destination system, and find and destroy pirates from the target faction. This can be done by hunting for them at the Nav Beacon, at RES sites, or even hunting them in supercruise.
Notes – The number of targets can vary from 2 – 81, which is the reason for the broad range of mission times here. Make sure you think about where you can hunt in the destination system before you take these missions. Taking missions to kill a large number of targets, then finding out there are no RES sites to hunt in can make these missions much more time consuming.
Assassinate / Take Down Known Pirate
Summary – Kill a particular pirate. The mission details will tell you where you can find them. Note that the targets here can be challenging, you may find yourself up against a well-engineered FDL with an escort of 3 vultures.
Expected Time – 10-40m
Method – Jump to the destination system, you may immediately get a Mission Nav marker, if not, go scan the nav beacon. When you return to supercruise you should find a “Mission Target” signal source on your nav panel, drop into that and kill the target.
Notes – Sometimes when you drop into the destination system, the mission will tell you that the target is not where it was expected and you need to acquire information on their location. To do this you will need to either:
Scan a datapoint on a surface installation - head to the target installation, and scan the point using the datalink scanner on your ship if you can, if you cannot (larger ships make this very awkward) you will need to deploy an SRV to scan the datapoint. Your mission will then be updated with the target location.
Meet a “contact”, you will be told a system, and body in which to meet this contact, you will find them in supercruise, they will identify themselves by putting messages in local chat asking you to follow their wake. Follow them and drop in on their low wake signal, they will then message in local again and your mission will then be updated with a new target system. Jump there and continue as normal.
Spec Ops Contract / Kill (Faction) Passenger Liners
Summary – Murder a specified number of target ships in the specified system. This is the illegal equivalent of the pirate massacre mission above.
Expected Time – 8-60m
Method – Jump to the destination system, and find and destroy ships of the target type. This can be done by hunting for them at the Nav Beacon, at RES sites, or even hunting them in supercruise.
Notes – These activities are criminal as your targets are clean, therefore you will get a murder bounty for these kills. However, you will not earn notoriety for killing mission target ships during the mission (you will still get notoriety for killing any other clean ships).
Wetwork Job
Summary – Murder a particular target. This is the illegal equivalent of the “Take Down Known Pirate” mission. As above, note you may find yourself against a challenging target here.
Expected Time – 10-40m
Method – Jump to the destination system, and go scan the nav beacon. Usually, the mission will be updated at this point to direct you to a particular body (star, planet or moon) in the system, head to that body and fly around it in supercruise. You should find a “Mission Signal Source” come up, drop into that and kill the target.
Notes – These activities are criminal as your targets are clean, therefore you will get a murder bounty for these kills. However, you will not earn notoriety for killing mission target ships during the mission (you will still get notoriety for killing any other clean ships).
Sometimes when you drop into the destination system, the mission will tell you that the target is not where it was expected and you need to acquire information on their location. To do this you will need to either:
Scan a datapoint on a surface installation - head to the target installation, and scan the point using the datalink scanner on your ship if you can, if you cannot (larger ships make this very awkward) you will need to deploy an SRV to scan the datapoint. Your mission will then be updated with the target location.
Meet a “contact”, you will be told a system, and body in which to meet this contact, you will find them in supercruise, they will identify themselves by putting messages in local chat asking you to follow their wake. Follow them and drop in on their low wake signal, they will then message in local again and your mission will then be updated with a new target system. Jump there and continue as normal.
Skimmer Kill
Summary – Kill a set number of skimmers (small automated defence drones) at the target settlement.
Expected Time – 10-30m
Method – Travel to the specified surface settlement, land and deploy your SRV (skimmers will not deploy until you have landed). You can then either drive around the settlement in your SRV and destroy the skimmers, or board your ship again and destroy them (the best weapons for this are dumbfire missiles due to their large splash damage radius).
Notes – Destroying the power generators in the base shut down different parts of the defence systems (shield gates, turrets etc). Which can make your job much easier. Note that you will get a bounty both for destroying skimmers and any other parts of the base which are damaged.
Surface Hunt / Urgent Kill order
Summary – Locate and kill the target.
Expected Time – 15-45m
Method – Travel to the surface installation specified as providing the target’s location. Use your datalink scanner to scan the data point identified in the mission information (either from your ship or an SRV). The mission will then update to a new location, jump to that system, scan the nav beacon, and return to supercruise. You should now find a Mission Signal Source on your navigation panel, head to it and kill the target.
Notes – Sometimes when you jump to the target’s system you will find them in supercruise, if this happens, they may try to interdict you, or you may need to interdict them.
Transportation
Courier Job / Report Delivery
Summary – Take some data on your ship to another station. No cargo space required.
Expected Time – 5-10m
Method – Fly to the destination station and hand in the data at the mission board.
Notes – You may have ships sent to stop you on these missions, evading them by beating the interdiction is the fastest method to proceed.
Deliver X units of a commodity
Summary – Take the supplied goods to the destination station.
Expected Time – 5 – 20m
Method – Load up the cargo from the depot (select the mission on the mission board) to see the depot. Take it to the destination station, and deliver it (again by accessing the depot from the mission board). You can deliver cargo in multiple loads taking whatever your cargo hold can carry each trip. However. I would recommend only taking missions you can complete in one or two trips.
Notes – Pirates may try to rob you along the way with these missions, as the commodities you are given to deliver are unique, if you lose any, you will not be able to fully complete the mission and may only be able to partially complete it.
Industry Needs X units of a Commodity
Summary – Find the required goods and bring them to the station.
Expected Time – 10-30m
Method – Gather the required Commodities (use a tool like EDDB.io or Inara to find where you can buy them) and bring them back to the station, and use the mission board to drop them off into the depot. As with the Delivery missions you can make multiple trips to gather the required goods.
Notes – The required time for these missions is longer due to the additional time involved in finding the specified commodity.
Black Box / Commercial Samples Salvage
Summary – Find the specified unique items from wrecks in space and bring them back to the station.
Expected Time – 10 – 15m
Method – Jump to the destination system, scan the nav beacon and return to supercruise. The Mission Signal Source should now appear on your nav panel. Drop into it and scoop up the required items.
Notes – Sometimes you may be followed into the site by pirates or other visitors, if this happens, you’ll need to decide between fighting them and just getting what you came for and leaving.
Liberate Commodity (i.g bootleg liquor)
Summary – Fly to the surface location and collect the required goods.
Expected Time – 13 – 20m
Method – Jump to the destination system, scan the nav beacon and return to supercruise. The mission will update, and you will find your destination highlighted on the nav panel. This will be a landable body, when you get close enough to the body a “minor wreckage” will appear on the navigation panel. Fly down to this location (often a wrecked SRV) on the ground nearby you will find canisters which will include your target. Scoop the containers up, either using your cargo scoop or an SRV.
Freelance
Economic Data Acquisition
Summary – Provide data from in the target surface installation.
Expected Time – 13 – 20m
Method – Jump to the destination system, your mission will update with the target ground based installation. Fly there and scan the specified datapoint. Note that you can do this either with your ship using the datalink scanner or using the same tool on the SRV.
Notes – many surface installations have an exclusion zone, at these you will get a bounty both, both for remaining in the exclusion zone for too long and for scanning the datapoint.
Illegal Black Box Salvage Operation
Summary – Find the unique items from a wreck in space and return it to the station.
Expected Time – 10 – 15m
Method – Jump to the destination system, scan the nav beacon and return to supercruise. The Mission Signal Source should now appear on your nav panel. Drop into it and scoop up the required items.
Notes – Sometimes you may be followed into the site by pirates or other visitors, if this happens, you’ll need to decide between fighting them and just getting what you came for and leaving. Also note that you will lose reputation with the faction who you are stealing from.
Steal Commodities / Liberate People (i.g Hostages)
Summary – take the specified items from other ships and return them to the station.
Expected Time – 15 – 25m
Method – Jump to the destination system and the mission details will update with more information about the target location. You will either need to scan the nav beacon to find the Mission Signal Source, or interdict your target in supercruise. You then need to use hatch breaker limpets and collector limpets to steal the required goods from the target. If your ship is tough enough, you may be able to achieve this while simply absorbing their attacks, or you may need to partially disable their ship before you are able to proceed.
Notes – you may find local law enforcement are called to interfere with your activities, and if your target is also a criminal, you may find yourself in the unenviable position of needing to defend them from the police in order to stop the cops from killing them before you are done robbing them.
Special Transport / Smuggling
Summary – The illegal version of the Delivery mission. Take the goods from the depot to the destination, but make sure you don’t get scanned along the way.
Expected Time – 5 – 20m
Method – Load up the cargo from the depot (select the mission on the mission board) to see the depot. Take it to the destination station, and deliver it (again by accessing the depot from the mission board).
Notes – There are multiple tools available to make it harder for security to scan you including:
- Make sure you evade any interdictions in supercruise.
- Use the target hologram to make sure that you drop out of supercruise aligned to the mail slot of the station.
- Fly quickly in to dock (the station itself won’t scan you if you are going over 100m/s).
- Drop a heatsink if you get the “scan detected” notification come up, this reduces your heat signature and often stops scans from completing.
Operations
Infiltrate the Data Link
Summary – Scan the datapoint on the megaship.
Expected Time – 8-15m
Method – Fly to the target megaship, find the “Ship Log Uplink” on your contacts panel, and use your Datalink scanner until the scan completes. Return to the mission giver.
Disable Emplacement Power Grid / Discrete Power Failure
Summary – Disable the power generator at a settlement.
Expected Time – 10-20m
Method – Fly to the target surface installation, locate the power generator and destroy it. This can be achieved by shooting or ramming the generator with your ship, or by landing and deploying the SRV and shooting it.
Disable Megaship Turrets
Summary – Disable the turrets on the megaship by destroying their turret power grid.
Expected Time – 12-25m
Method – Fly to the target megaship, target and scan the megaship using your Datalink Scanner. This will reveal the other targets including the defence turrets. Fly close to one of these and scan it again with the Datalink Scanner, this will then show the “Turret Power Grid” on the contacts list. You can then either shoot or ram this target to destroy it and disable the turret.
Notes – Ramming the turret power grid does not give you a bounty, however shooting it or any other part of the megaship does.
Planetary Scan Job
Summary – Locate a temporary surface base, and scan the datapoint there.
Expected Time – 15 – 25m
Method – Jump to the destination system, your mission will then update with a specific body on which to find your target. Fly across to that body, as you get close to it you will see a “Search Area” appear on your Nav panel, fly towards this, however, note that the area will move repeatedly as you get closer to it, so try to maintain your altitude so that you can remain in glide until you are as close as possible to the actual location. Once the location resolves into visible buildings, you are at your target, scan the data point using your datalink scanner, and return to the mission giver.
Support
Donate Money
Summary – Give money to the faction.
Expected Time – 30s
Method – Accept the mission on the mission board, then go to the Completed Missions panel to make the donation and complete the mission.
Notes – There is no pay for these missions, you can however use them to increase your reputation with a faction swiftly. They do also sometimes result in follow-on missions, which will offer pay.
Donate Commodities
Summary – Give goods to the faction.
Expected Time – 10 – 60m
Method – Gather the required Commodities (use a tool like EDDB.io or Inara to find where you can buy them) and bring them back to the station. As with Donate Money missions, these can be completed extremely quickly if you already have the commodities in your ship, the timing above has assumed you need to go acquire it.
Notes – There is no pay for these missions, you can however use them to increase your reputation with a faction swiftly. They do also sometimes result in follow-on missions, which will offer pay.
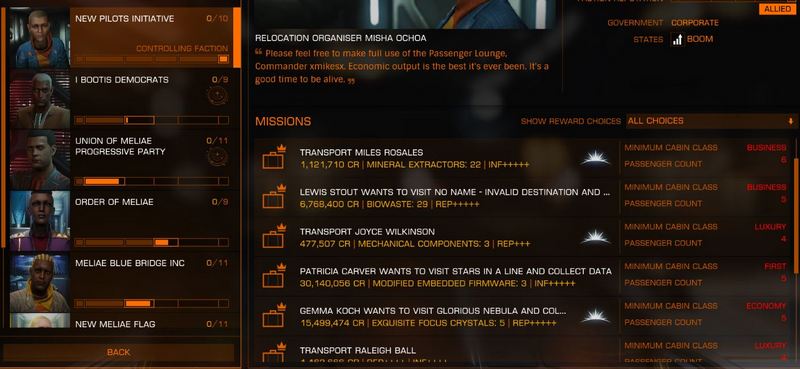
Passenger Missions
Passenger missions are a type of contract available from the Passenger Lounge where you offer to take passengers to specific locations. Each group of passengers will have specific requirements for the number of places that they require as well as the class of the cabin which they are willing to travel in. There are four different cabin classes:

- Luxury (can only be placed on Saud Kruger ships)
- First Class
- Business Class
- Economy Class
Note that the higher the class of a higher-class cabins require more space per passenger. As a result, a size 6 Economy Class cabin will fit 32 passengers, Business class 16, First class 12, and Luxury just 8.
There are two main types of passenger missions, Group and Personal transportation. Group transportation is relatively straightforward, each mission will specify a number of seats required, and a required cabin quality. As long as you have sufficient space at the required cabin class or better, even if it is across multiple cabins, then you will be able to transport the group.
For example, if a mission requires 30 Business class cabin seats, and you have 26 spaces available in Business class cabins, and 12 in First class, then you will be able to take that mission, leaving you with 8 First class seats still available, which you could use for a different group.
Personal transportation missions are more complex. Firstly, each traveller expects privacy for their party, so will require a cabin to themselves. This means that if a group requires 2 seats in an economy cabin, and you put them in a size 6 economy cabin the remaining 30 spaces are automatically considered to be taken.
In addition, Personal transport groups have different behavioural traits which will affect their requirements on the trip. You can find this information on the passenger profile on the mission board, traits you will find there include the following:
- Stoic / Cowardly – determines whether a passenger will be bothered by hull damage.
- Laid-Back / Impatient – determines whether a passenger will be dissatisfied by delays.
- High/Low-Value Target – determines likelihood of hostile ships being sent after you.
- Secretive – passengers with this profile will be less satisfied if the ship is scanned.
- Demanding – determines the likelihood of the passenger making demands for commodities during the trip.
- Neutral – satisfaction is reduced by illegal actions.
- Criminal – satisfaction not affected by illegal actions but the ship will be attacked if scanned by system authority.
These passengers may make new demands of you during a mission, asking you to reroute to a different destination, or asking you to provide some commodities, or even asking you to kill someone who is pursuing them. You do not have to complete these actions, but if you decline, and also perform other actions which reduce their satisfaction by too much, the passenger will demand to be dropped off at the nearest station, and your mission will be failed (they will not pay for it).
Group Transportation
Group Seeking Transport
Summary – Take the people where they need to go.
Expected Time – 5 – 10m
Method – Load them up into the lowest class of cabins that they will fit into, jump to the destination system, land at the destination station and hand the mission in at the passenger lounge.
Notes – The pay for these missions scale with both the number of passengers, the quality of the cabins required, and the distance in supercruise to the destination station. As a result, long supercruise passenger missions tend to pay better, but take a lot longer.
Rescue Mission
Summary – Get refugees from burning stations to safety on rescue ships.
Expected Time – 3-5m
Method – Make sure that your ship has shields and heat sinks, the burning station produces an incredible amount of heat, and explosions and debris make docking more dangerous than normal. Load up the passengers into economy cabins (desperate people don’t worry about higher quality cabins) take them to the rescue ship nearby and unload.
Notes – These missions are incredibly fast to complete due to the short supercruise time due to the close proximity of the rescue ship. Equally the sheer number of missions available also mean that they are great for building REP (reputation with the local factions). For this reason, when a burning station has Empire or Federation aligned factions, this is THE fastest method of gaining rank.
Personal Transportation
Personal Transport
Summary – Take the passenger and their party to where they want to go.
Expected Time – 5-10m
Method – Load up the party into the required quality and size of passenger cabin, and head to the destination. Leave them in the passenger lounge.
Notes – These missions can generate additional requests, this can include re-routing to a different destination, providing some goods or killing someone who is after them. You do not need to take these bonus requests, but they will often offer some additional pay if you do.
Sightseeing Adventure (short range)
Summary – Take the passenger and their party to specified tourist site(s) and back home.
Expected Time – 10 – 60m
Method – Read the passenger profile to understand the restrictions on the mission. Load up the party, and head to the destination system. Once there, you’ll find a tourist beacon on the navigation panel (you may need to scan the nav beacon first), fly over to it. Once there, target the tourist beacon and scan it so you get the lore message pop up on panel 2. The mission will then update and you can head to the next destination. Once all destinations have completed, head back to the origin station to drop off the passengers at the lounge.
Notes – Some of these missions will be very short and require only a single destination ie Robigo to Sothis. Others will require multiple stops, with each leg of the journey covering 100+Ly, and may include planetary beacons and long supercruise times, so take care to read the detail when taking these missions.
Visit Tourist Destination (long range)
Summary – Take the passenger and their party to the specified destination and bring them back.
Expected Time – 60m – 40h
Method – Read the passenger profile to understand the restrictions on the mission. Make sure your ship has as long a jump range as possible to ensure that you are adequately equipped to reach the destination in a reasonable time. These destinations will be thousands or tens of thousands of Ly out into the galaxy. Load up the party, and head to the destination system, go to the relevant tourist beacon (you may need to use the FSS to locate it) and scan it. Then head back home to hand in the mission.
Notes – Note that with very long journeys such as this, you may find using Neutron stars useful as a way to accelerate your trip.